Showing posts with label seeds. Show all posts

Wednesday, June 5, 2013

June in the garden

The garden, June 2013
There's a lot to be happy about right now in my life. The garden is coming together beautifully, if a bit slower than intended. My tomatoes, peas, radishes, carrots, beets, broccoli, kale, collards, salad greens, and lots of other yummy things are coming up gangbusters. Our new sprinkler makes rainbows, too, which puts a lovely hue on everything!

The tomatoes
I have about 40 tomato plants, all told. Half are meaty, slicing tomatoes (Purple Cherokee, Roma, MarketMore, etc), and the other half, pictured here, are cherry tomatoes. I had issues with my meat tomatoes because I planted them to get them outside on Memorial Day or thereabouts, then we had that heavy freeze. Everything had to stay inside the house, and they got a bit root bound. They also got bumped around a lot, and quite a few got broken or squished in the process. The cherry toms fared much better. All of them but one survived, and they're perky as all get-out. I have no idea how I'll be caging them!

The 'broken bed'
The cherries are planted in the "broken bed", the one that was in pieces in the last picture. Because of how it was put together last year, we needed to raise it up higher for this season, and add more (and better quality) soil. After adding a big of height and dirt to it, it looked much better. We also replaced the end pieces, as the original birch logs I used had begun to rot in place.

Green onions lurking
Down the other side of the broken bed we used these bricks, which we filled with dirt and then planted our green onions into. I'm hoping they'll do well, and really spring up, as our family loves green onions in many dishes. If they don't make it, I'll replace them with marigolds to help keep bugs and predators away from my cherry tomatoes. Around the outside of this bed, I also planted nasturtiums, which are both pretty and edible. When they come up, they will add a gorgeous yellow to the dark red and green of the plants.

Squash bed
At the other end of the cherry tomato bed, I planted my zucchini. I ran into a problem when I discovered that it wasn't my two types of winter squash that I had to worry about cross pollinating... it was one of them and my zucchini and pumpkins! It turns out that all these plants are part of a large family, cucurbita. Some of the family will intermix with other parts, and some won't. It took me a bit of research, but I finally came to the conclusion that I could easily plant my butternut squash next to my acorn squash, but putting the zucchini in that bed would bring disaster (at least if I wanted to save seeds, which I most definitely do!). The zucchini has now been planted on the far side of the pea bed, so that there is a physical barrier between it and the offending acorn squash, as well as a bit of space. I will hope that whatever pollinators visit my plants don't hit up both sides of the pea fencing!

Beets and radishes
The radishes are taking over the tire, although there are quite a few weeds hiding inside that leafy canopy as well. The beets are faring rather well, and I have high hopes for them. I'll plant a second crop of them once these ones are grown, in the hopes that we'll get a very late fall/early winter harvest from them. In amongst the radishes are the carrots, and they're looking fantastic! Most are an inch high, and are now easily distinguishable from the surrounding weeds. That makes weeding MUCH easier!

Peas and tomatoes
We doubled up our pea fence this year by zip tying two of the green metal stakes together to make one very tall stake. Last year's peas grew up and over the short fence I had, and ended up breaking in several places because of lack of support. Not so this year! I'm looking forward to collecting delicious, fresh peas from the vines currently growing like wild. Compared to this time last year, our peas are thicker, greener, and much more vigorous, so I think we'll be harvesting a good amount.

I planted some bush beans as well, this year, from the seeds I saved from last year's beans. They're tucked in at the end of the squash bed, two 4-foot rows. It's not a lot, but I wanted to grow enough for a couple of meals, as well as to save the seed for next year. This year, we're going more for pole beans, though, with Scarlet Runners, Rattlesnake Pole, and Kentucky Wonders. They'll be planted (very soon, I expect!) in tires, with a tripod of poles and rough hemp twine wound around. I can't wait for the delicious flavor of the beans, and both the Scarlet Runners and the Rattlesnakes are excellent when dried, for use in soups and baked beans!

The greens bed
Last but definitely not least, the greens bed is doing phenomenally well. There are a few weeds but not overpowering. All but the Great Lakes lettuce came up, and I'm not sure if it just didn't germinate or if the weeds ate it. The cold snap did all the greens well, but especially my broccoli and kale, which are both reaching for the sky happily. I expect to see some broccoli forming in the next couple of weeks, and I might have to start harvesting kale soon as well.

So what's growing in your garden this month? I've yet to put my cucumbers in, and my swiss chard and corn as well. All are going into containers that can be moved around (although the cukes will be stationary once they begin to vine, as the trellis will go on and hold it in place), making it convenient to mow and weed whack.

Listed at the Homeacre Hop #22!

Check back often for information on canning, preserving, general homesteading and more. If you have questions or comments, please write to me below. I love to answer questions! You can follow the blog via Network Blogs and Google Friend Connect (see the left hand column for the button). If you purchase items I have linked through Amazon or the ads on my site, I receive an affiliate portion of the sale. If you find the items are useful, please purchase from my site! 
 
You may also be interested in:

Busy, busy!
Insanity in the garden
Garden update and my contest win
It doesn't have to be expensive
Making maple syrup

Thursday, May 30, 2013

Busy busy!

This weekend I'm heading up to Lovell, Maine to preach at a little church there. This has left me little in the way of blogging time. However, I did do work on the garden with Ms. T's help, so here are some pictures to tide you over!


This is the front garden, which is basically right outside our front door. The hydrangea was my Mother's Day gift from the twins last year, and the sweet william was this year's gift! The pansies are sis's beautiful annuals. I do need to build this garden up a bit, but it's so pretty when it's in full bloom.


This is what I am guessing will end up being the squash bed. It got dumped full of unsifted dirt, and now we're working our way through it and putting the dirt in different beds. We've finally gotten it down far enough that we can start putting soil back into it (sifted, of course). This is one of the new beds. In the back of it, you can just see the split rhubarb/horseradish bed.


Ah, there's my rhubarb! That's the stuff I planted last year, and which we transplanted to this bed a few weeks ago. There are two more rhubarb crowns in that bed, and two in the bed closest to the camera (beside the stone). The back of the rhubarb bed is filled with four horseradish roots, which I hope will come up.


 This is (will be) our asparagus bed. We have two kinds of asparagus to plant in it, and it's the next on our sift list. Beside it will be a bed of strawberries. These are right under sis's window, and ought to provide an interesting visual!


These lovely window boxes were created by sis last weekend, to cover up the gravelly messy part beside our front steps. However, with the torrential rains, they have gotten so waterlogged that I had to bring them onto the porch. I'm going to leave them here for a few days until they dry out. 
 

This is the start of the rock wall that Ms. T is making. You can just see the two loads of dirt in the left of the picture, which will be filling up the entire space. The yard slopes down at that point, and we're going to flatten it out and bring it into a berm that is held in place by the rock wall. Ms. T has some great talents, and rock building is definitely high on the list. I just don't have the patience for it!


My kale and broccoli, unlike the rest of the plants, have really loved the frosts of the past week. They're growing like crazy! I am hoping that the heat they're predicting for this week won't stunt the growth that's been happening. They're in a shadier part of the yard, so I'm holding out hope.


My potatoes are ready to have another tire stacked on top. They're really lush and looking good, much nicer than last year's greenery.


 This is a long view of the side yard where the garden is. The empty bed you see is actually going behind the pea bed and beside the squash bed, but we're using the backhoe to move dirt, so we can't block in that squash bed until it's full. To the right you can see the two tire beds, and beyond those (out of the picture) are the herb tires.


This is the bed that we put together last year with just logs. It's a hugelkultur bed,  meaning there are punky logs and branches and leaves buried under the soil, providing nutrients and helping to hold moisture in. We raised this one up a bit, because the single logs weren't providing enough room for things to grow. So the bricks from the dismantled fire pit became one side (and the little holes are going to get filled with flowers and green onions!), and the log that was on that side got piled up on the other side. Now it's twice as deep, and full of gloriously rich composted soil.


My peas (left) and tomatoes (right) seem to be doing alright. We doubled the height of the pea fencing this year, because last year we had the peas falling over and grabbing other plants. I think we're safe this time! The tomatoes are doing better than they look here, as these were freshly battered by a storm. They're much perkier now, and most of my non-cherry tomatoes are planted in this bed. To the far right is a staggered row of romaine lettuce, which I hope will enjoy the shade it's soon to get from the tomato plants.


 The big green things are radishes, intermixed with carrots. I desperately need to thin out the radishes. We're going to be collecting the leaves, dehydrating them, then turning them into a slightly spicy powder to use in sauces and stews. The other half of this bed has baby beets in it, which also need to be thinned and weeded, but I have to wait 'til they're a bit bigger.


The tires are going to be planted with pole beans either this weekend or early next week. A three pole tee pee will go up in each tire, and then jute cord or wire will be twined around. The beans will be planted in a circle, and be trained up the legs and jute. I expect these to get up to 12 feet high!

So there's my little update. :) I promised pictures to people, and so I have kept good on my promise! What's your garden up to?

Check back often for information on canning, preserving, general homesteading and more. If you have questions or comments, please write to me below. I love to answer questions! You can follow the blog via Network Blogs and Google Friend Connect (see the left hand column for the button). If you purchase items I have linked through Amazon or the ads on my site, I receive an affiliate portion of the sale. If you find the items are useful, please purchase from my site! 
 
You may also be interested in:

Insanity in the garden
Garden update and my contest win
It doesn't have to be expensive
Making maple syrup
Peas - an early, cool weather crop

Monday, May 20, 2013

Insanity in the garden, or "How to expand your garden size!"

Pots ready for planting peppers
I apologize to all my faithful readers for going a full ten days without writing anything! I ask for forgiveness due to busy paying work AND busy garden work. You'll see from today's post just how much has been going on around our lovely little freehold. Everything's growing, including the size of our available garden space, and so I invite you on the journey around our "micro farm".

There was a frost, you see...
Last weekend we started getting frost warnings. We went from nights in the 40s and 50s (acceptable for all but my peppers), to low 30s and mid 20s! Suddenly, not only did I have to make sure everything came in from outside, I also had to get in all the plants from the outside greenhouse (it is too small to hold any real heat, unfortunately). The indoor greenhouse is still full of seedlings too delicate for outdoors yet, so the bigger plants sort of got clustered on the floor and chairs all around the greenhouse, so they could at least get some light. Walking through the house was a bit... well, foresty, to be honest. However, nothing died, and even the couple of surviving tomatoes from my earlier planting did alright under some plastic boxes.

Basil and other herbs
My herbs have been doing incredibly well, growing to rather large sizes despite being stuffed into small plastic cups. They're going to need to get outside very soon, and now that the frosts are over, they'll be going into their new homes (more on that later). It's been nice to have their fragrant green leaves scattered around every flat surface, though, I admit. Every time you brush past a basil plant, the scent that wafts up makes you want to pull out the food processor and make pesto. I have two kinds of basil (Genovese and Sweet), sage, chives, green onions, and cilantro going right now, and I plan on picking up parsley and rosemary starts once we have the new herb bed set up and ready for them. My dill is still pretty tiny, but I wanted to get at least some of it started indoors. The rest will be direct seeded into the herb garden.

Peppers galore
My peppers have been doing incredibly. Well, the hot ones. The green ones didn't do well at all, and I'm not sure what I did wrong. Time to check my notes and see what mistakes I made! Likely it's just that I used old seed. In any case, there are a good bunch of peppers coming up now, and most of them are getting big. They're almost ready to start going out into the outside greenhouse. Once we're solidly in the 50s at night, they'll be coaxed into hardening off. I learned a lot about peppers this year from Pinterest (thank you, O My Addiction!), and so instead of planting the peppers directly into the ground, we're going to put them three or four to a container instead.

Pepper containers!
These big planters are for our peppers (well, some of them). They'll continue to sit in front of the big tire garden there, though we'll probably balance the colors out with "white green white green white" just because we can. Peppers, it seems, need to "rub shoulders" with one another in order to produce a good crop. They are also sulfur lovers, and so some suggest placing a match and a bit of fertilizer at the roots of each plant as you put them in. For nicer fruit, make a mix of one tablespoon of Epsom salts to a gallon of water. Spray over the plant and it helps it to produce larger fruit.

Peas on the right
Our peas, planted a few weeks ago, are doing great. They will need a fence in there by the weekend, and maybe earlier. From past experience, I know these will vine very tall, and so the pea fencing will have to be double high. The left hand row (in this picture) is snap peas, and the right hand row is Lincoln shell peas. Other than radishes, I am guessing they'll be our first crop! In the rest of this raised bed we'll be planting tomatoes. Though you can't tell in this picture, there are two small tomato plants that made it through the frosts. The rest will be planted out as soon as we're guaranteed no more frost.  Along the very left hand edge of the bed, I planted several clumps of romaine lettuce. They'll grow happily under the shade of the tomatoes and peas, and hopefully will provide us with another earlyish crop.

The broken bed
My broken bed is about to get less broken. Last year, this bed housed my peas, green beans and tomatoes. This year it'll be home to more tomatoes and some squash, and probably whatever peppers don't fit in the pots we have. This was the very first bed I built, way back when! Under this bed, there are punky logs, old branches, and a ton of leaves. The edges were made of old wood as well, and it simply isn't good enough for this year's crops. We want the bed a bit deeper, and so we're replacing bits of it, and upgrading other sections. The two end logs are being replaced with huge chunks of wooden post that we picked up for free at the dump. They just happened to be the right size, and they won't roll off. They're also a good two inches higher than the logs that were previously there (and are now quite rotted down).  It'll be good to get this bed into production again!

Radishes and carrots
The first of the tire beds is full of root crops again. I've planted it with twice as many carrots as last year, because although we got lovely ones, they were waaaaay too few. I mixed the carrot seeds with radishes, because it helps to space out the carrots and also lets you mark the rows. The radishes are growing quickly, and desperately need to be thinned. The carrots are there, though, tiny fronds hiding in amongst the radish leaves.  Beside these, in the other half of the tire, are the beets. I planted more beets this year than last year, because the few small ones we got were so sweet and incredibly tasty that we decided there must be MORE this year!

The new greens bed
The newly built raised bed on the shady side of the lawn is doing extremely well with the broccoli, kale, and various types of greens. I was worried the late frost would harm them, but it doesn't seem to have done them a bit of harm. Quite the opposite, in fact! The kale is such a beautiful dark green, and the broccoli is starting to thicken up its stalks. Some of the lettuce and collards are even beginning to look like real lettuce leaves instead of being indistinguishable from the weeds.

The old herb bed
The other large tire bed was used for herbs last year, and to good effect. We pulled in a lot of dill, cilantro, sage, thyme, chives, and basil. The compost was very rich, and made for incredibly delicious and flavorful herbs. This year, we'll be switching this bed over to more beets and possibly some bush beans. Nasturtiums might also find their way into this bed, as they are both beautiful AND edible. If I pick up parsnips for the fall, they might also go in here. The tire beds are quite deep, and so are good for hearty root crops, especially ones that can over-winter.

The new herb bed(s)
This year, we're switching our herbs over to a new system. It is comprised of more tires, with room for planting both inside the tires and in between them in the diamond shaped spaces. We'll be moving over the chives, German thyme, and oregano, packing them each into their own separate growing area. We have several mints ready to be planted as well, and of course those must be kept firmly in hand or they'll take over the yard. In the center spots will go tall herbs like my mammoth dill and some of the larger basil, and perhaps a sunflower or two. We have lots of sprouted herbs to go in, seed to plant, and hopefully I'll get some cuttings from neighbors and friends as well.

Potatoes are growing!
Those tiny potato plants I showed in my post from a week or so ago have become these large, vigorous things! They're quickly filling up the tires that we put them into. This means we'll be picking up more tires and stacking them on top, adding more dirt, and encouraging more potatoes to grow. I am hoping that there will be enough of these potatoes that we don't have to purchase any at all this year. That would make me very, very happy. There's a deep sense of contentment when you can look at something and think, "It might just be enough." Sometimes self-sufficiency can seem overwhelming, and then you see something like this and it comes into focus. We just need to work on one or two bits at a time, until it all comes together.

The potato tires in all their glory
I'll have better counts later in the week, but I am guessing we have close to 40 tomato plants. I doubt that'll be enough for our family, both in fresh eatables from the garden and for our canning and dehydrating purposes. Tomatoes really are a hit-or-miss sort of thing, and so it's best to plant too many than too few. We'll be supplementing our tomato supply with extras from a local organic farm, where we can purchase delicious and meaty romas for less than the price of grocery store ones. Honestly, though, there's never such a thing as "too many tomatoes" because they can be put to so many uses! Eat the fresh, toss them in a salad, can them whole or crushed or stewed, make salsa, make tomato juice, make ketchup, make tomato puree, make tomato soup (and never eat Campbells again!), dehydrate them and make powder for use in sauces and breads, and broil them for a tiny and crispy taste of summer to enjoy all year.

Untouched "raw" compost
We get all of our garden dirt from our local dump. They have a huge compost pile that's chock full of manure, grass and straw clippings, chipped wood, and who knows what else. However, even after composting there for a couple of years, that black gold has a lot of rocks, grubs, and some garbage in it. While we have just tossed it into beds and sort of picked the worst of it out, this year we're going to a new level. We're sifting it! The dirt comes home from the dump, full of all sorts of twigs and half-rotted logs and stones, and we shovel it into the sifter and work it through.

Sifted composted soil
The result is this incredibly dark, rich, fluffy soil that makes you want to roll around in it. This soil will be perfect for anything we want to grow, although our first two plants going into the sifted soil are the new rhubarbs and our horseradish.  Both plants appreciate well drained, rich soil that is relatively free of rocks and other obstacles, allowing for a wide spread of roots and tubers. While it does take quite a bit of work, it's completely worth it to be able to put our food into this sexy soil.

The sifter
Grey created this sifter for us to make things a bit easier. It's a length of hardware cloth stapled onto a square wooden frame he built from a 1x2. We just put in four or five shovels full of the compost, and pick through to get the worst of the non-organic material out (there's a lot of bits of broken glass, and old garden cloth, and other such things). Then you shake the sifter over the wheelbarrow or the raised bed, and the good dirt goes through the holes into the container, and the rocks and other debris stay in the sifter itself. This is then separated into organic and inorganic items. Inorganic things go into the garbage, and organic ones are tossed into a pile where they can continue to compost.  The only issue with this type of soil is that, like sifted flour, it's very fluffy. This means that the bed I filled yesterday to brimming with freshly sifted dirt, is now compacted about half way and I have a lot more work to do to get it filled properly. Still, it's worth it!

Beautifying the front yard
We haven't just added vegetables to our yard, though. Sis went out and bought pretty flowers for the flower boxes we picked up. They're along the front of our porch area, where nothing really grows. They cover up the ugly rock beneath, without causing a problem by growing against the house. On the front porch there's a new plant holder, where we're currently displaying the pretties we got for Mother's Day from the kids. The front flower garden is coming into bloom again, and my hydrangeas are really greening up. We've got a few petunias for there, as well, and some other flowers, too!

What sort of things are you growing in your garden? Do you have a large yard like us, or are you gardening on your balcony or windowsill? What's your favorite thing to grow?

Shared at Wicked Good Wednesday (May 22)!

Check back often for information on canning, preserving, general homesteading and more. If you have questions or comments, please write to me below. I love to answer questions! You can follow the blog via Network Blogs and Google Friend Connect (see the left hand column for the button). If you purchase items I have linked through Amazon or the ads on my site, I receive an affiliate portion of the sale. If you find the items are useful, please purchase from my site! 
 
You may also be interested in:

Garden update and my contest win
It doesn't have to be expensive
Making maple syrup
Peas - an early, cool weather crop
Spring in New Hampshire

Tuesday, April 30, 2013

A blog give-away!

I follow Mary's Heirloom Seeds and just started following Back to the Basics today. They've paired up to do a seed give-away! If you're hankering for good quality seed but can't afford it, now's your chance. Enter the give-away and maybe you'll win a Baker's Dozen Combo Pack!

Good luck!

Monday, April 29, 2013

It doesn't have to be expensive

Miss T watering one of the raised beds
 Sometimes, the idea of getting started in gardening can be quite overwhelming. It's a lot more than just getting some seeds and tossing them into dirt, after all, and there's so much information available on the internet and in books that it's hard to know which way to turn for help. If you look to popular sites like Martha Stewart or Home Depot, you find a lot of great ideas with huge price tags.

Chives
It doesn't have to be expensive, though. If you look at the header picture there, you can see Miss T watering a raised bed. That bed is made by screwing together four pieces of plank wood that I found on the side of the road for free. The decking screws we used were "borrowed" from Gray's stash, but honestly they're not all that expensive to buy new, and you only need a handful per bed (optimally 9-12 screws per raised bed).

The bed to the left of the "nice" one is made from fallen birch logs that I dragged out of the forest behind our house. There are no screws at all involved in that one. I pulled the logs into place, and then I used broken bricks and various small stones to hold the logs in place. I used a big squarish log that Gray couldn't get to split as an end piece, both to make up the distance of one log that was kind of short, and to make a spot to sit on while working on the garden.

German thyme
To the right of the nice bed are tires. The large tires are (very dead) tractor tires that a friend brought over for us in his truck. These, too, were freebies. Because they are so deep, I use them for root vegetables that might not do so well in our rocky New Hampshire soil. Last year I planted my beets in one of the big tires, and it was the first year I've ever gotten a real crop of beets (and I've been doing it for 20 years now!).

Currently, the second large tire hosts my herbs, however I'll be moving them to car sized tires next week. There will be two rows of tires pushed together, five on one side and four on the other. This gives me nine tires to plant in, PLUS seven little triangular spots for larger herbs. The tires themselves will be hosting my more "invasive" herbs: chives, thyme, rosemary, oregano, mint (probably two types), marjoram, sage, and cilantro. The triangles will be planted with dill, basil, and more cilantro and sage most likely. The taller plants will be easier to harvest from those middle spots.

Happy kale
You can often get tires for free. I pick mine up at the local dump, taking as many as will fit in the van each week. Check out any car repair places local to you, as well. It actually costs money to dispose of tires, and most places will be happy to give you as many as you like, in a variety of sizes. For those who question whether it's safe to use old tires in your gardens, you will have to decide for yourself. This FAQ gives a lot of really good information, but the final choice has to be your own. As you can see, I certainly don't have any concerns about using tires in my gardens! The major concern that I have is that I need to keep cold loving plants out of the tire planters during the heat of summer, because the soil becomes quite warm (black rubber heats up a LOT). They're great for over-wintering herbs and things like garlic and lettuce, though! You can also paint your tires white to help keep the heat down.

My potatoes are planted in tires this year
I use tires for my potatoes almost every year. Last year I tried a potato tower, but was underwhelmed by the results. I didn't get enough water into the tower, and so there were few potatoes. I've tried hilling potatoes as well, but it requires a lot of space and a lot of effort (digging up potatoes is hard work). With the tires, you just plant and go, and at the end of the growing season you tip the tire over and your potatoes are right there ready for you.

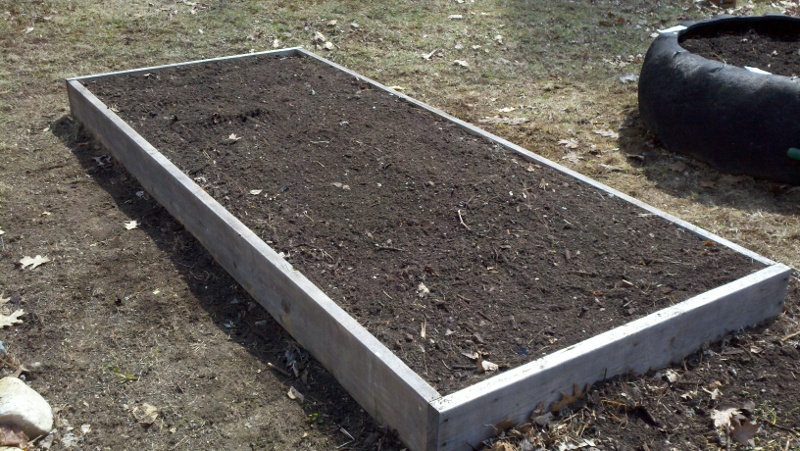
The newest raised bed
This newest raised bed was built last weekend and was wood that we had picked up at the dump. Quite often, people bring pieces of board that are no longer useful to them (this one had cracks and knots in it, for instance) but that do fine for a raised bed. We screwed it together, put it in place, and filled it. Now there are plants in it (kale and broccoli that got started weeks ago indoors) and seeds as well (lettuces, spinach, and collards).

You might be asking yourself, what about all that dirt? Soil is expensive! You're right of course. It is expensive to purchase soil. However, there are alternatives. The dump here in Jaffrey has a massive compost pile that people put grass clippings, animal manure, used soil, bits of punky logs, and a bunch of other stuff into. We hop  over in the backhoe (or the van, with buckets, or a truck) and fill up the scoop, and take it home. We do have to pick through the compost, because people do sometimes dump in things that don't compost well (rocks, the occasional beer can, bits of plastic), but it doesn't take long. Sticks and punky wood can go into the bottom of your raised bed, as can leaves, newsprint, and cardboard. The compost goes on top.

The new bed, long view
You can plant in plastic milk bins, Rubbermaid tubs, old wooden or waxed cardboard boxes (though cardboard will only be good for a year and then break down), and dozens of other things. Heck, you can even use old plastic containers from take-out food or margarine and such. People have even used old kiddie pools (the hard plastic type) and food grade plastic buckets they picked up at the grocery store. Your imagination and willingness to look and ask is all that holds you back.

Those who may be on Food Stamps or SNAP can also join in. You can use your SNAP benefits to purchase seeds! Check out your local grocery store or Agway for discount or bargain seeds. Some stores will even give away last year's seeds for free, because they don't have as high a germination rate. Ask neighbors who have gardens if they have extra seeds you could have or could trade for.

Putting the time in to grow at least some of your own food will yield so many benefits. There's the joy of seeing something grow that you're intimately involved with. Playing in the dirt is a type of anti-depression therapy, plus the extra sun helps your body manufacture seratonin, the natural chemical that helps you be happy. You will know exactly where your vegetables come from, how they were grown, and what chemicals were used on and around them. There will be no question as to whether your food is genetically modified. You'll be providing fresh and healthy food for yourself and your family. That food will lower your grocery bill during the summer, and with a bit of effort, you can put some of it away for use during the winter as well. You'll add beauty and value to your yard. You'll even have less grass to mow and water!

If you could only grow one vegetable, what would it be? 

Linked to the Homestead Barn Hop #109, Common Sense Preparedness, the HomeAcre Hop, and Tuesday With a Twist #4!

Check back often for information on canning, preserving, general homesteading and more. If you have questions or comments, please write to me below. I love to answer questions! You can follow the blog via Network Blogs and Google Friend Connect (see the left hand column for the button). If you purchase items I have linked through Amazon or the ads on my site, I receive an affiliate portion of the sale. If you find the items are useful, please purchase from my site! 
 
You may also be interested in:

Making maple syrup
Peas - an early, cool weather crop
Spring in New Hampshire
Busy days, longer days
Spring update

Thursday, April 18, 2013

Peas - an early, cool weather crop

Different kinds of peas for my garden

Peas are a wonderful early crop that you can grow here in the north. They like the cold, and even tolerate the occasional snow shower with aplomb. As long as more than half your nights are above freezing, and your soil has defrosted enough to allow you to work it, you can plant peas. In fact, the only time you want to avoid planting peas is in the heat of summer, because they do not like warm weather at all. The moist, cool days of spring are best for these hardy vegetables.

The raised bed - before
There are three basic types of peas: pod or shell peas, sugar pod or snap peas, and snow peas. Both shell and snap peas can be dehydrated and used in soups and stews later, but snow peas are best eaten fresh, or frozen quickly when they come out of the garden. There are also peas that are high in starch that are designed to be dehydrated, and they are generally a sub-category of shell peas.

The raised bed - after
Shell peas are the ones you buy at the store in cans or frozen, that have large, plump peas and no pod at all. They're great for use in soups, stews, salads of all kinds, and as a side dish. They can be canned, frozen, or dehydrated for use throughout the year. They can be eaten fresh off the vine. I love using shell peas for all sorts of things, and for me they're like popcorn on a summer evening. I can while away the time during a movie by popping the pods open and devouring the sweet treat within. I always plant a type of shell pea, and I prefer Lincoln peas because of their heritage and open germinating status, as well as their superior flavor and size.

The second type of pea that I love to plant are snap peas. These are edible podded, but with juicy little peas inside. They work best when eaten fresh or frozen for later use, and don't stand up as well to canning or dehydrating. If you have a garden that contains broccoli and cauliflower and carrots, you can freeze all four ingredients together to make something similar to the store-bought California mix, which defrosts well and cooks up quite nicely.

Marking a straight row
Snow peas are the ones we think of as being in Oriental foods. They are flat, and if they have peas inside they're minuscule. The pod is the tasty part of snow peas, and they're best served fresh. Pick snow peas in the morning, right after the sun has come up and dried the dew off them, and you'll get them at the height of flavor. Toss them in salads, serve in stir-fry, or just eat them with a bit of your favorite salad dressing.

Peas are a vegetable high in nutrient value. A whole cup of peas will rack up only 134 calories. They have no fat, incredibly low sodium, and 9 full grams of fiber per cup. They're a great source of Protein, Vitamin A, Riboflavin, Niacin, Vitamin B6, Folate, Magnesium, Phosphorus and Copper, and a very good source of Dietary Fiber, Vitamin C, Vitamin K, Thiamin and Manganese (from SelfNutritionalData).

Peas laid out in the garden
From a gardening point of view, peas are in the easy category. There's no thinning to do, and short of giving them no water at all, they tolerate being wet, dry, and cold fairly well. As soon as your ground can be hoed or rototilled, you want to get your pea seeds into the ground. Generally, this will be when daytime temperatures reach into the 60F range, and evenings move between 30F and 50F.

Plant the seeds an inch deep (to the first knuckle on your thumb) and about two inches apart, in a straight row. Generally you would plant two rows about six inches apart, and then put a pea fence in between the rows. This allows the pea vines to grow upward and support themselves. This year, I've decided to plant one ten foot row of Lincoln peas, and one ten foot row of Oregon Sugar Pod peas, on either side of a pea fence. I'm told they won't cross-pollinate, so I'm crossing my fingers!

Peas are a quick crop, taking about 60-70 days to grow to maturity. Planting them in mid-April means that my peas will be ready by mid-June, and I'll probably start harvesting them at the beginning of June. By mid-July, they'll be done giving me peas, and I can transplant fall crops like pumpkin and such into their place. Don't pull up your peas, though. They have a lot of nitrogen in their roots, and if you snip off the vines at the soil line, they will continue to amend the soil and improve it. You can plant your next crop in place around the roots of the peas.

Clearly marked rows
Once peas start producing pods, you need to keep up on harvesting them. Go out every single day and pick peas, and you will have vines that continue to produce more and more pods. Remember that a plant's job is to create seed to carry on its genes, and so by picking the pods daily, you're telling the plant that it hasn't yet fulfilled its purpose. It will continue to produce seed pods for as long as the weather and soil allow it to, in an attempt to reproduce itself.

If you want to collect your own pea seeds for next year, simply let a plant or two at the end of your row keep its pods until they turn yellowish brown and dry out. The dried pods can be collected and opened, and the peas set out in a sunny window for a couple of weeks to dry thoroughly. Dry pea seeds should be stored in a cool, dark place. I like to seal mine into vacuum seal baggies, ensuring they're kept as dry as possible.

Have you ever grown peas in your garden? What's your favorite type? Do you only plant enough to eat them fresh, or do you like to preserve your peas for the year?

Check back often for information on canning, preserving, general homesteading and more. If you have questions or comments, please write to me below. I love to answer questions! You can follow the blog via Network Blogs and Google Friend Connect (see the left hand column for the button). If you purchase items I have linked through Amazon or the ads on my site, I receive an affiliate portion of the sale. If you find the items are useful, please purchase from my site! 
 
You may also be interested in:

Spring in New Hampshire
Busy days, longer days
Spring update
Repotting seedlings
Soft sandwich bread