Showing posts with label fire. Show all posts

Thursday, October 25, 2012

Danger, Will Robinson!

A gas generator (1)
I keep an eye on the weather throughout the day using a website called Wunderground. This morning, they sent me an email saying that their usual "winter preparedness" email series was being suspended because they wanted to do an emergency preparation series instead, ahead of the storm that's heading our way. I went to their website to check out all the details. The storm we need to watch, called Sandy, is currently (2:30pm EDT on Thursday, October 25, 2012) a category 2 hurricane coming through Haiti and into the Florida area.

Go grocery shopping (2)
Sandy may be downgraded to a nor'easter by the time it gets to New England where we are, but they are warning not to consider that lightly. Apparently, it's a 50% chance whether it'll head out to sea, or hit us square on. NOAA and other weather agencies are urging people along the coast and throughout New England (and New York City as well) to be prepared for emergency conditions. Part of the problem right now is that the autumn weather is not cooperating. They can't tell which way the wind will blow things, nor can they tell whether it will be warm and produce rainfall, or if it'll be cold and come down on us as hail, sleet or snow.

The bottom line is, be prepared. This doesn't mean you need to be ready for the Zombie Apocalypse, but it does mean making some common sense decisions now, well in advance of the possible storm.

Let's look at the whole Rule of Threes thing in regards to our potential storm. Those of us who may be in the storm's path should do what we can so that we're not a burden on the system. We can last three minutes without air (first aid), three hours without shelter, three days without water, three weeks without food and three months without hope.

Three minutes without air in this storm translates into being ready for possible household emergencies.  Is your first aid kit stocked up? Do you have bandaids, enough of the usual medications and vitamins, and a good supply of ibuprofen and acetaminophen? Consider the kind of injuries you might have to deal with during a three day storm with no power, and be ready for them.

Three hours without shelter isn't as difficult when you're already in your own home. If you lose power and have no other means of heat, wear several layers of clothing, close off all but one or two rooms of your house, and keep everyone in that small, confined area. Cover windows with thick blankets at night to hold heat in, and let the sun in during the day for as much passive solar energy as you can get. Break out the winter coats, gloves and shoes, and don't forget hats! A sleeping bag can keep you (or you and a child) warm, but you might be warmer if you and your whole family snuggle together in one place under the same batch of blankets. There's a reason Alaskan sled drivers used to sleep with their dogs!

Got fuel? (3)
Of course, if you have a fireplace or wood stove, make certain you have enough wood or coal on hand to see you through the emergency. Have the fuel in a spot that's easy to get to, and as much out of the elements as possible. Have tinder and small pieces of wood on hand to make starting your fire easier. If you run a generator, ensure it's full, and have an extra gas can on hand, and don't run it all the time (turn it on long enough to cool your fridge and freezer and run the hot water for bathing, then off again to conserve fuel).

Three days without water is unlikely to be a problem during a storm in New England, but having clean, potable water might be problematic. Do you have a way to filter water so it's safe to drink? Can you store some in clean milk jugs just in case you need it? At a minimum you'll want one liter of water per person per day, but if you're at home and you have the ability to store more, then do so. Water can be used for washing, drinking, flushing the toilet manually, brushing teeth, cooking, and a hundred other things.

Three weeks without food should not be a problem for anyone with the amount of advance warning we're getting about this storm. If you're not the type to keep a lot of food on hand, pop out to the store now and get some extra bread and milk, and any other staples that will be easy to cook with what you have on hand and that will last in the pantry if you don't have to use them.

Three months without hope doesn't seem to be something that would be an issue with the upcoming storm, but don't dismiss it so quickly. You may be stuck in the house with children or friends for a few days, and having some cards on hand for poker or euchre, or a board game or two, is easy to do. Pick up some popcorn at the store and have an old fashioned night of popcorn and story telling. Grab a few books and have them stashed in the room you'll retreat to if you lose power, and maybe have a craft or two ready to work on as well.

Cars get buried. (4)
All of the above might seem like over-kill, but consider for a moment the possibility of this storm (or another) catching you unawares in your vehicle. You've become blinded by snow or driving sleet, and you pull over. You're prepared, having a "get home" bag available to pull some food out of, and some warm clothes. You decide to wait it out, a sensible thing to do. Come morning, you wake up to find your car is thoroughly buried in snow, and you can't get out. What happens now?

If you're prepared, it's not going to be a problem. People will have at least a vague idea of where you are. You can expect outside help within a reasonable amount of time. If you're prepared, it might be uncomfortable but it won't be a panic situation, nor will it be a disaster.

Be prepared! Don't let yourself fall into the trap of thinking "preppers" are just doomsday prophets calling for the end of society. In reality, "preppers" were (and are) people like your grandparents, who put up food from their garden and who saved every penny to make sure they had what they needed. They're people who have the necessities on hand or know how to make them should something (like a surprise snow storm) happen. They're you, and me, and your neighbors, ready for whatever the New England weather throws at them.

Check back often for information on canning, preserving, general homesteading and more. If you have questions or comments, please write to me below. I love to answer questions! You can follow the blog via Network Blogs and Google Friend Connect (see the left hand column for the button). If you purchase items I have linked through Amazon or the ads on my site, I receive an affiliate portion of the sale. If you find the items are useful, please purchase from my site!
 
You may also be interested in:

Cooking without electricity
Making dilled green tomatoes
Ham and Bean soup
Learning at the Freehold
The Fall and Winter Update, 2012


1) Image by Calvin Ho Jiang Lim / Wikimedia Commons
2) Image by David Shankbone / Wikimedia Commons
3) Image by MJCdetroit / Wikimedia Commons
4) Image by woodley wonderworks / Wikimedia Commons

Wednesday, October 24, 2012

Cooking without electricity

My wood cook stove
There's some kind of emergency here in New Hampshire just about every winter. Either it's a major snowstorm, or we have flooding, or something else happens. Power goes out all over the place. You probably have candles, and maybe a lantern or two. You can pull out extra batteries for the flashlights. But what do you plan on eating?

Fire in the stove
 I love my wood cook stove. With it, I am not dependent upon the vagaries of the public utility system. I have the opportunity to largely ignore power outages, because my lovely Glenwood B provides us with heat and a place to cook. With its moderately sized firebox to the left, it's six "burners" on top, and the large and spacious oven area, it does everything our electric stove does, and more. And better yet, it does it with style. Nothing beats coming in from shoveling snow and putting your feet up on the chromed hob to warm them while a pot of soup simmers on top of the stove.

A casserole cooking in the oven
Wood stoves work differently than electric ones, or even gas stoves for that matter. The top of a wood stove is one big burner, despite the little circles you see on good quality cook stoves. There are no dials that adjust the heat; you have to learn to do that using wood and the position of your cooking gear on the stove top! In a way, though, the use of a wood stove for cooking is much more intuitive, much easier than doing so with an electric stove, despite the fluctuations in temperature. You learn it, much as you learn any new skill, and as you do you can enjoy knowing that your granny or great-granny probably learned the same skills many years ago!

Open for viewing
The magic of a wood stove starts in the fire box. Different stoves have them in different places, but the most common spot is on the left hand side. There's usually a little door that lets you in from the front to load wood, however you can also lift off the top burner circles and load up that way. Sometimes, that's a convenient way to load up initially, perhaps the night before, so that all you need in the morning is a single match to get your stove going for the day. The grate to the very left has a few uses. First, it swings open to allow you to pull out the ashes without disturbing the fire itself. This is very important if you're cooking something that takes a long time, such as a full size turkey. You can also slide open the little holes in the grating to allow oxygen to get in to the fire, which helps adjust the temperatures within. I liked to keep an old fudge pan in under there, so that when it was time to take out the ashes I just had to pull the pan out and dump it, instead of spending a lot of time raking and shoveling.

Oven racks, older than you think!
Soft woods, like pine or punky birch, are wonderful for getting your fire going. However, to cook anything, you'll want a nice hardwood like ash or oak. The best way to know which woods work for you is to actually use them and see what happens. Different areas of the country produce different types of wood, and those cause different heats and qualities of fire. If you're lucky enough to have a supply of appropriately sized split ironwood, you'll be able to cook anything!

A small box stove
Those circles that you see on any kind of wood stove are designed for use during cooking. If you want to fry something at high heat, pull out a ring and put your cast iron pot or pan right over the fire. Old cast iron actually has a ring on the bottom, which nestles into the cut out on the stove. This allows you to safely put your pan right over the fire, heating it quickly and efficiently. Woks, too, can be slid into the openings to allow more direct heat. If you need to simmer something, slide it way over to the right, away from the fire box. Wood stoves that have a shelf extending from the stove top allow you to keep the food warm without cooking it more. There are also usually shelves above the stove top, where it was common to keep a pot of water or tea or coffee for everyone. The shelves can be a good place to put your bread starter, if you happen to keep a sourdough handy.

The heat in a wood cook stove comes from that fire box, then initially goes directly up the flue. Once the flue is hot, there is a toggle you can push to the side to allow the heat to circulate inside the stove itself. Another toggle will force the air to circulate all the way around the oven before going up the flue. This heats your oven fairly evenly, although as with all ovens (even electric and gas ones), there will be hot spots.

In my opinion, a wood stove gives you a lot more scope for cooking than electric does. A proper dutch oven can be set inside for baking bread, or perched up top for making stew or soup. Any cast iron pan or pot can be used very easily and will provide an incredibly beautiful and non-stick surface for your cooking needs. You can pile the top of your stove with as many pots and pans as will fit, instead of being stuck with only the four standard burner spots of a regular stove. You can use griddles and large pans just as easily as small ones, because the heat is everywhere.

Of course, the best part of having a wood stove is that you can just light it up because it feels nice or looks good. While the fire within won't last as long as with a heating stove, a wood cook stove gives off a nice blast of heat and is generally pretty easy to keep going if you're up and about. There's just something cheery about sitting in the kitchen by the wood stove, having a cup of tea with family.

If you know how to use your wood stove before an emergency hits, you'll be proficient enough to feed your family easily when there's no power at all. You'll quickly become accustomed to keeping a large pot of water on the back of the stove, for washing up or for tea, or whatever else comes up. And you'll find your family tends to gravitate toward its cheery spot in whatever room you have it!

Check back often for information on canning, preserving, general homesteading and more. If you have questions or comments, please write to me below. I love to answer questions! You can follow the blog via Network Blogs and Google Friend Connect (see the left hand column for the button). If you purchase items I have linked through Amazon or the ads on my site, I receive an affiliate portion of the sale. If you find the items are useful, please purchase from my site!
 
You may also be interested in:

Making dilled green tomatoes
Ham and Bean soup
Learning at the Freehold
The Fall and Winter Update, 2012
Making your own fire starters 

Tuesday, October 2, 2012

Making your own firestarters

A home-made firestarter
I love fires, and we're just entering the season for it. The nights are cold, sometimes hovering down around freezing, and even the afternoons are chilly with the overcast skies and the on-again off-again rain. While we aren't at the moment of winter, where the fireplace gets lit and stays lit until spring, it's definitely that time when we occasionally decide we want the house warmer than it is on its own. There's something emotionally boosting about a nice wood fire, too, that tells you you're safe and snug in your own home. It's a sense of security like no other.

The basics
Starting a fire in damp weather can be a real hassle. Struggling with paper or cardboard, chemical starter logs, or tinder that isn't quite dry is frustrating and it takes away from the enjoyment of your fire. It can also pump a lot of smoke into your house, which is not good. Rather than pay for expensive firestarters, why not make your own? They're so simply and easy, and are made from things found around the average house. It takes only a few minutes to put them together, and a couple of hours to let them dry and cool, and you'll have dozens sitting ready to light up your fire.

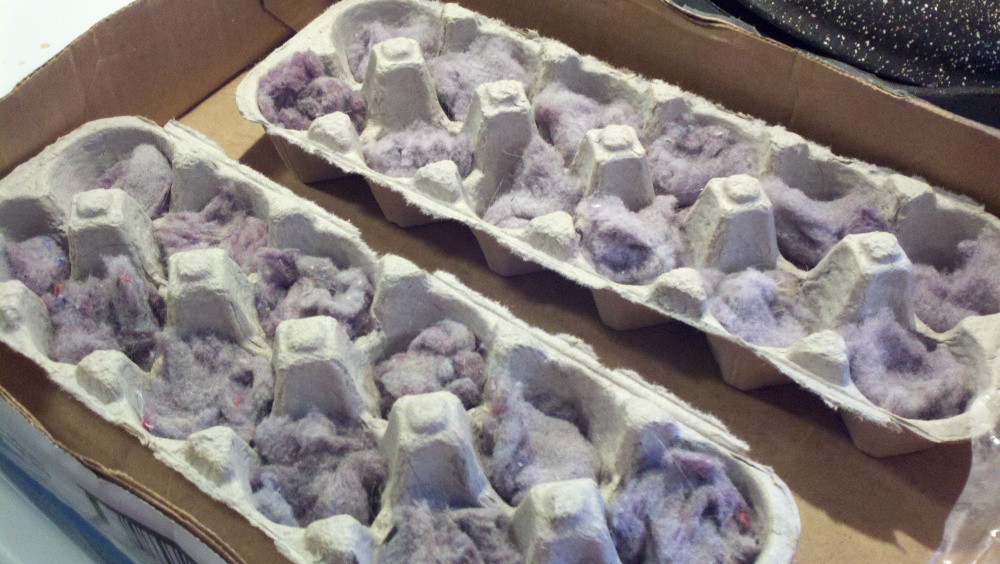
Lint makes great tinder
Begin with the basics of the firestarter: an egg carton (or several), some wax (bee's wax, paraffin, or left over candle stubs are all fine), a pile of dryer lint and some wood shavings or finely shredded paper. I tend to make firestarters around canning time, so I use the wooden boxes the jars come in as holders. Since the boxes are covered in a somewhat waxy substance, and are also plastic wrapped, you don't have to worry about the melted wax weeping onto any furniture or table tops. You could also sit them on folded newspaper or old cardboard boxes.

Melt your wax
In a pot that you don't care about (once it's held melted wax it will no longer be good for anything else), melt up your wax. I have a metal bowl that works very well for this, but you could just as easily pick up an old double boiler or pot at Sally Ann or Goodwill. Set your stove to a medium high heat, and don't leave. Wax is flammable, and needs to be tended. Luckily, this stage doesn't take very long. About five minutes will melt a block of paraffin wax the size of an apple. If you see smoke, turn down your heat a little bit, as it can scorch the wax and could lead to a fire. If you spill wax on your counters or stove, wait for it to cool and then pop it off using a plastic knife or spatula.

Fill the cups with lint
While your wax is melting, you can work on the body of your firestarters. Rip the tops off your egg cartons, because there's no use for them in this. The lip that keeps the lid closed can go, too. Place your egg cartons onto whatever safe base you have, and then fill each egg cup with about a tablespoon of lint. It doesn't matter what color or texture the lint is. All lint burns very quickly, and so it makes excellent tinder. Some campers keep a tiny zip baggie filled with lint for starting their campfires easily.

Add the wood shavings
My partner happens to like doing wood working, and so there's always a ready supply of wood shavings from his planer for me to use in making firestarters (or to use as mulch in the garden). I add some of the wood shavings to the wax because it makes it easier to pour. However, you can also tuck the wood shavings into the egg cups with the lint, then pour the plain wax over the whole thing. Either way is acceptable. It's a personal choice.

Pour in the wax
Pour the wax into the egg cups as evenly as you can, making sure to coat the lint and wood shavings completely. The wax acts just as candle was does, protecting the wick from burning up too quickly. It also keeps the lint and wood very dry, which allows you to use them even in damp or wet weather.

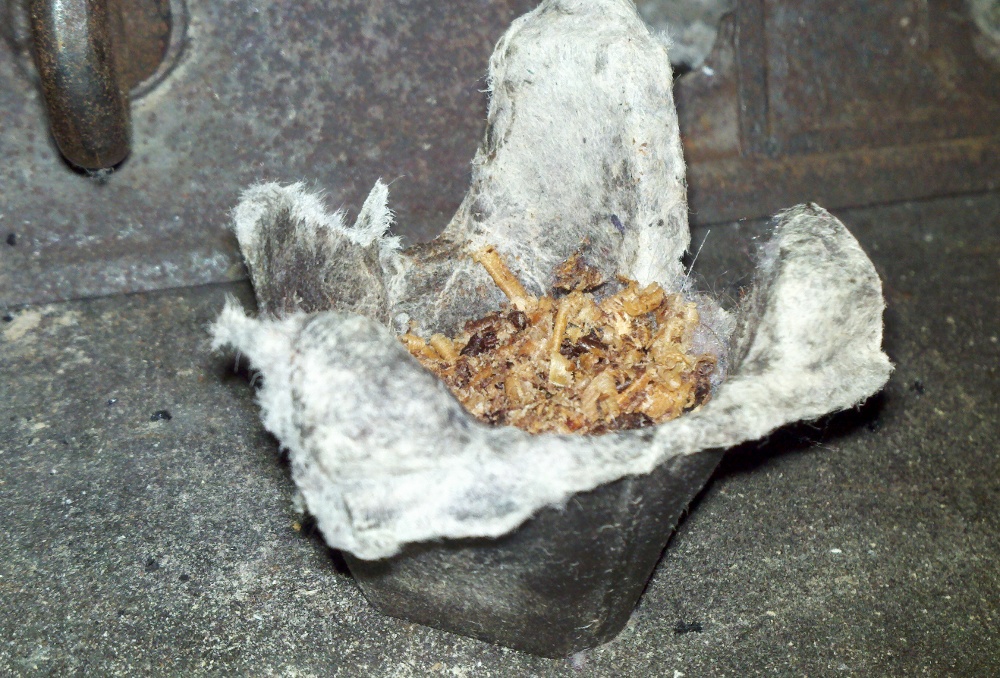
A single firestarter
Let your wax dry and cool completely before doing anything else. Once it's cool, you can cut the egg cups into separate pieces and store them in a zip baggie or plastic container. Each firestarter should burn for 3 to 10 minutes depending on the size, amount of lint and wood, and amount of wax used. For a fire designed to heat the house, I will lay down a piece or two of newspaper, place a firestarter at either end of the woodstove, then place small bits of wood on top of that. I then light the newspaper, which in turn lights the firestarters. As the fire picks up, I add medium then large pieces of wood.

Light it up
For a camp fire or a fire that you're starting without paper, it's quite easy to light the firestarters. Using a match or lighter, just set fire to one corner of the egg carton and it should immediately catch. Be sure to have the firestarter where you want it before lighting it, because they catch very quick and burn very hot. Provided you're not using green, wet wood, it ought to begin to smoke and burn within a few minutes.

It really is that easy. I love making my own firestarters, and the kids help with portions of the creation, too. They love playing with dryer lint, and will happily stuff egg cups for me while I'm preparing the wax. The starters do a great job of getting most any fire going well, including outdoor fires for camping and such.

The following video is a short view of one of my firestarters burning merrily in the fireplace at my home. You can see how well it catches, and how steadily it burns. The video should give you a good idea of what your final product should look like.