Showing posts with label video. Show all posts

Wednesday, December 26, 2012

Doctor Who!!!

Okay, shameless plug for Doctor Who - the first of the "new" series is now available on Amazon for less than half price. Like... for the price of a new release video at Walmart:


If I had $22 I'd be buying it! It's a savings of $57 freakin' dollars... *GRIN*

Saturday, October 6, 2012

The fall and winter update, 2012


The garden was wildly successful this year, in my opinion. Although not everything grew as well as expected, this was the very first year (with little to no preparation, I might add) at our new home. The expectation for this year was pretty low, because of a variety of factors including lack of money to put into the whole thing.

The regular raised beds worked wonderfully well. The "corn field" didn't create as full cobs as I'd hoped, but that was more because of how late I planted it. Had I put the corn seed in the ground a month earlier, when it was supposed to go in, we'd have been swimming in corn. As it was, we've had a few decent ears and quite a few baby corn, and lots of pretty stalks for decorating with.

The tire raised beds worked fantastically. I want more of these for next year, no question at all. They take a lot of dirt to fill, but we got most of it for free from our dump (which has a huge compost pile that farmers use for manure and rotted vegetables and such). I can't praise the tire gardens enough. For root crops they were perfect, because the soil inside was not compacted and had been largely picked through to remove major rocks and sticks. This left the soil in perfect condition to host carrots and beets. My only "real" issue was that the soil was so rich that the tomatoes I planted in there were bushy with almost no fruit!

The girl child's square foot garden wasn't as successful as the other gardens. The squash, watermelon and peas didn't do as well. I think part of the problem is that it didn't have enough compost in it. Next year it will be built one more level higher, with additional soil, which should make a difference. Being so low to the ground, I think it was inviting critters to come have salad and squash. Still, her tomatoes did take off, and are still producing!

The potato towers came down a while ago, and were only mildly successful. If I were to try them again, I would have to put a soaker hose inside the tower, either in the center or spiraling up the middle. I think the major problem was that the tower dried out incredibly quickly, and that stunted the potato growth. We also got some stink bugs and potato bugs, which didn't help matters. Of course, had the plants been strong and healthy to begin with, we'd have had less issues!

We still have to put in the asparagus and strawberry beds, as well as the fruit trees and bushes we want. I have to plant some ground cherries, as well, because we really enjoy eating them. I hope to build the shade beds before the snow comes, but we'll see what happens. There's so much going on, I'm not sure I can manage it.

That's the winter update, folks. As always, don't be afraid to ask questions. There will be more coming up on canning, dehydrating, long term storage, emergency first aid, and dozens of other hot topics, so keep checking back!

Check back often for information on canning, preserving, general homesteading and more. If you have questions or comments, please write to me below. I love to answer questions! You can follow the blog via Network Blogs and Google Friend Connect (see the left hand column for the button). If you purchase items I have linked through Amazon or the ads on my site, I receive an affiliate portion of the sale. If you find the items are useful, please purchase from my site!
 
You may also be interested in:


Making your own fire starters
Using a FoodSaver
How to make liquid laundry soap
Creamy Crab Pesto with pasta
Pressure canning - don't be scared

Tuesday, October 2, 2012

Making your own firestarters

A home-made firestarter
I love fires, and we're just entering the season for it. The nights are cold, sometimes hovering down around freezing, and even the afternoons are chilly with the overcast skies and the on-again off-again rain. While we aren't at the moment of winter, where the fireplace gets lit and stays lit until spring, it's definitely that time when we occasionally decide we want the house warmer than it is on its own. There's something emotionally boosting about a nice wood fire, too, that tells you you're safe and snug in your own home. It's a sense of security like no other.

The basics
Starting a fire in damp weather can be a real hassle. Struggling with paper or cardboard, chemical starter logs, or tinder that isn't quite dry is frustrating and it takes away from the enjoyment of your fire. It can also pump a lot of smoke into your house, which is not good. Rather than pay for expensive firestarters, why not make your own? They're so simply and easy, and are made from things found around the average house. It takes only a few minutes to put them together, and a couple of hours to let them dry and cool, and you'll have dozens sitting ready to light up your fire.

Lint makes great tinder
Begin with the basics of the firestarter: an egg carton (or several), some wax (bee's wax, paraffin, or left over candle stubs are all fine), a pile of dryer lint and some wood shavings or finely shredded paper. I tend to make firestarters around canning time, so I use the wooden boxes the jars come in as holders. Since the boxes are covered in a somewhat waxy substance, and are also plastic wrapped, you don't have to worry about the melted wax weeping onto any furniture or table tops. You could also sit them on folded newspaper or old cardboard boxes.

Melt your wax
In a pot that you don't care about (once it's held melted wax it will no longer be good for anything else), melt up your wax. I have a metal bowl that works very well for this, but you could just as easily pick up an old double boiler or pot at Sally Ann or Goodwill. Set your stove to a medium high heat, and don't leave. Wax is flammable, and needs to be tended. Luckily, this stage doesn't take very long. About five minutes will melt a block of paraffin wax the size of an apple. If you see smoke, turn down your heat a little bit, as it can scorch the wax and could lead to a fire. If you spill wax on your counters or stove, wait for it to cool and then pop it off using a plastic knife or spatula.

Fill the cups with lint
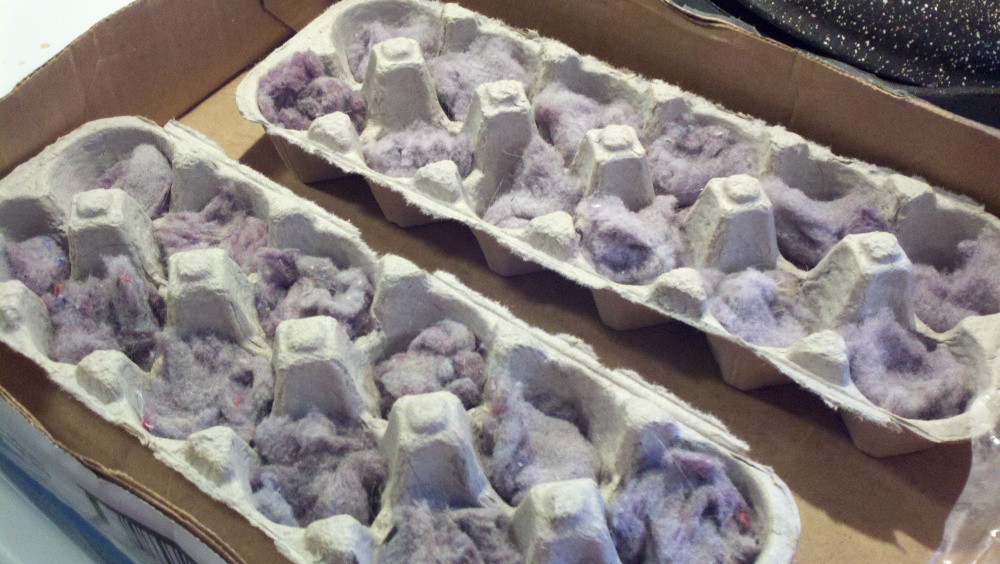
While your wax is melting, you can work on the body of your firestarters. Rip the tops off your egg cartons, because there's no use for them in this. The lip that keeps the lid closed can go, too. Place your egg cartons onto whatever safe base you have, and then fill each egg cup with about a tablespoon of lint. It doesn't matter what color or texture the lint is. All lint burns very quickly, and so it makes excellent tinder. Some campers keep a tiny zip baggie filled with lint for starting their campfires easily.

Add the wood shavings
My partner happens to like doing wood working, and so there's always a ready supply of wood shavings from his planer for me to use in making firestarters (or to use as mulch in the garden). I add some of the wood shavings to the wax because it makes it easier to pour. However, you can also tuck the wood shavings into the egg cups with the lint, then pour the plain wax over the whole thing. Either way is acceptable. It's a personal choice.

Pour in the wax
Pour the wax into the egg cups as evenly as you can, making sure to coat the lint and wood shavings completely. The wax acts just as candle was does, protecting the wick from burning up too quickly. It also keeps the lint and wood very dry, which allows you to use them even in damp or wet weather.

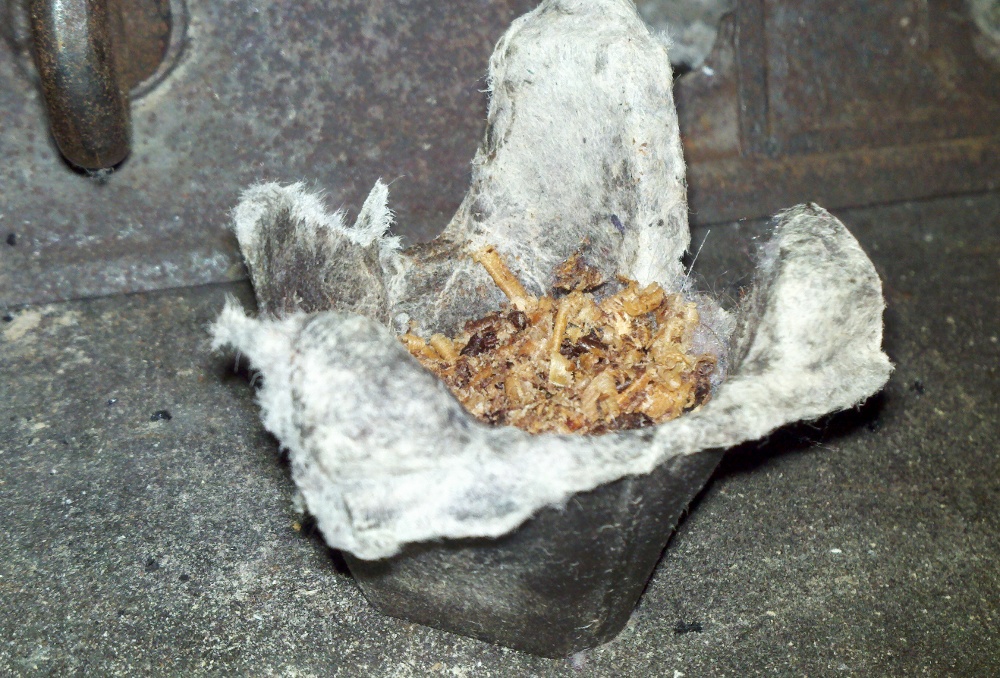
A single firestarter
Let your wax dry and cool completely before doing anything else. Once it's cool, you can cut the egg cups into separate pieces and store them in a zip baggie or plastic container. Each firestarter should burn for 3 to 10 minutes depending on the size, amount of lint and wood, and amount of wax used. For a fire designed to heat the house, I will lay down a piece or two of newspaper, place a firestarter at either end of the woodstove, then place small bits of wood on top of that. I then light the newspaper, which in turn lights the firestarters. As the fire picks up, I add medium then large pieces of wood.

Light it up
For a camp fire or a fire that you're starting without paper, it's quite easy to light the firestarters. Using a match or lighter, just set fire to one corner of the egg carton and it should immediately catch. Be sure to have the firestarter where you want it before lighting it, because they catch very quick and burn very hot. Provided you're not using green, wet wood, it ought to begin to smoke and burn within a few minutes.

It really is that easy. I love making my own firestarters, and the kids help with portions of the creation, too. They love playing with dryer lint, and will happily stuff egg cups for me while I'm preparing the wax. The starters do a great job of getting most any fire going well, including outdoor fires for camping and such.

The following video is a short view of one of my firestarters burning merrily in the fireplace at my home. You can see how well it catches, and how steadily it burns. The video should give you a good idea of what your final product should look like.


Monday, October 24, 2011