Showing posts with label turkey. Show all posts

Wednesday, January 23, 2013

How to cook a wild turkey

Wild turkey (1)
Wild turkeys are nothing like their fat commercialized cousins. They live in the forests around New England like kings, and indeed, they are rather majestic. They can fly and are very impressive when in flight. They don't need help from a farmer to produce offspring. They're decidedly NOT fat, either. Cooking a wild turkey is similar to cooking a commercial one, but very different at the same time. You have to be more careful with a wild turkey, and the cooking time is shorter, too.

Ready for roasting
We were lucky enough to get two wild turkeys just after the season ended, from a friend who had more turkey than freezer space. I gladly took them off his hands, because nothing beats the flavor of wild turkey. It's so different from the pale, big breasted things you get at Market Basket!

The first thing you'll notice is that our turkey looks a lot more like a chicken than a turkey from the grocery store. Wild turkeys do not have massive breasts. They also don't have any white meat, so be aware of that. The breast meat is much lighter in color than the rest of the bird, but it's all dark meat, make no mistake. The skin is a bit more yellow than store-bought birds, and in this case, the wings were removed before we got it into our pan. The bird itself weighed about 10lbs or so, and this one was male, so I'm told (the other one we have was female).

Bread for stuffing
We like stuffed birds, and so I made a bread stuffing for our wild turkey. You may prefer a rice stuffing, or something entirely different. When cooking wild bird, however, never leave the cavity empty or you will end up with a terrible gamey flavor throughout your meat. Stuff it with a quartered onion, if nothing else, then discard the onion when ready to serve.

Add butter and an egg or two
For my stuffing, I used the bread ends from a 12 grain loaf that were starting to go a bit stale. I cut the bread into cubes about an inch in size, then mixed in a couple tablespoons of butter and two eggs. Some people like to add in the liver of the bird, or even beef liver, and I have done this in the past for a very delicious stuffing. Since I didn't have the liver, I couldn't do that this time. I added a variety of spices (celery seed, salt, pepper, paprika, minced fresh garlic, and dehydrated onion flakes).

Add the spices
Stir it around a bit, then add in just enough freshly boiled water to moisten the entire thing. It should look a bit mushy without having standing liquid. If you add too much water, you can toss in a few more bread cubes. Not enough water is solved by pouring in a bit more. Mix it all up very well until it's quite mushy but sticking together almost like a thick, lumpy batter. Allow the stuffing to cool enough to put your hands into it, because it's much easier to stuff a turkey with your hands than with a spoon!

Making it self-basting
Wild turkeys do not come with pop up timers (although you can buy them) and are not self-basting. However, you can easily make your turkey mostly self-basting by adding bacon to the top of it! Once your turkey is in the pan, breast up, and you've stuffed it, spice up the skin however you like. Then carefully lay three or four slices of bacon (I used three, split in half) over the majority of your turkey. As the turkey cooks, the bacon will drip grease, basting your bird for you. The bacon also adds a touch of flavor and seems to pull out any gamey taste, as well. And... well... it's BACON.

I roasted my turkey in the Westinghouse cooker for several hours. I cooked it at a very low temperature, about 250F, for just about six hours total. For the last half hour, I put the pan into the oven and finished it off at 350F, to brown the breast skin and crisp it up. I wish I had photos of the finished product, because it was quite lovely and moist, but we gobbled it up so fast that I forgot to take pictures.

By cooking the turkey with the bacon over it, I avoided most of the basting. I did go and baste about twice or three times, right near the last hour. I wanted to make sure the flavors were distributed well. When I put the bird into the oven to brown, I shoved the bacon off, exposing the skin underneath. It crisped up beautifully.

Wild turkey has a much more earthy flavor than commercial turkey. You know it's wild. It isn't offensive at all, but the flesh has a different texture. It's a bird that lived a free life, not one in a cage or a small box, and its meat reflects that life.

When cooking any game, always double-check before you begin cooking. Make sure the innards are fully cleaned, and salt it if you feel it necessary. This bird still had a bit of lung in the upper cavity, which isn't unusual (it happens with commercial birds, too!) but would taste pretty funky if left in to cook. Even deer steaks or roasts should be rinsed very well and patted dry with a towel. With a bird, you want to get inside with your hands and feel around for anything that doesn't seem right.

What's your favorite game meat? How do you prepare it?

NOTE: Don't forget about the Freehold giveaway! The contest is open until January 29th, so enter now!

This post was shared at the Homestead Barn Hop #96 (click here to enter).
We're also listed on the Old Fashioned Recipe Exchange 1/29 (click here to enter).

Check back often for information on canning, preserving, general homesteading and more. If you have questions or comments, please write to me below. I love to answer questions! You can follow the blog via Network Blogs and Google Friend Connect (see the left hand column for the button). If you purchase items I have linked through Amazon or the ads on my site, I receive an affiliate portion of the sale. If you find the items are useful, please purchase from my site!
 
You may also be interested in:

Review and Giveaway
How to: perk coffee
Swiss Chard and Lentil Soup
Winter Wonders - making a planting schedule
Winter Wonders - the seed catalog


1) Image by imagefactory / morgueFile free photos

Monday, November 26, 2012

How to render turkey fat

Rendered turkey fat
There are a lot of things you can do with left-over turkey, and I'm sure that everyone's getting their fill of it by now. Whether you had your feast on Thursday or the weekend, the likelihood is that you have a significant amount of turkey in your fridge or freezer, and are wondering what to do with it all. I'll touch on a few recipes this week, some easy and some more labor intensive, but first I want to cover the basics - what to do with all that fat!

Believe it or not, turkey fat isn't as bad for you as butter is. It isn't as bad for you as most vegetable fats like canola or "vegetable oil" and is naturally low in saturated fats. If your turkey is pasture fed, it's also full of a lot of necessary vitamins and minerals. This means you can save that turkey fat and use it in any recipe that calls for lard or animal fat, and it can be used in place of butter.

Fat on top of broth
Before using your turkey fat, though, you need to render it. The process of rendering fat (of any kind of animal) means to remove all the non-fat from it. For me, that meant all the little bits of turkey that remained in it, as well as some herbs. It's not a difficult process, but it does take a bit of time and patience.

The easiest way to get at the turkey fat is to take all your leftover skin, bones, gristle and assorted drippings, put them in a big pot, and make stock from it. Once your stock is made, set it outside (if it's cold enough) or in the fridge until it is thoroughly chilled. The fat will float to the top and harden.

Removing fat with a spoon
Fat in a bowl
Once the fat is hard, remove it with a slotted spoon to a bowl or small sauce pan. The broth can then be heated and canned or poured into containers and frozen. Your broth will be largely fat free, because you will remove the majority of it!

The fat can then be heated on top of the stove to melt it. Use a medium high heat, and it will melt down very quickly. You'll see in the picture that my fat has bits of herbs in it, which floated to the top and got stuck there. Before finishing, I need to remove those herbs. They will go bad if they are not removed, and that will ruin your fat!

Melting turkey fat
Once the fat is melted, but before it gets really hot, pour it through a coffee filter to remove the last of the impurities from it. This helps make sure there are no bits of meat or bone or herb left in it, which might cause it to go rancid. If it doesn't look clear, re-heat it and pour through another filter. This is the most important part of rendering, and it makes a huge difference on both the length of storage of your fat, and the flavor (donuts fried in fat that contains meat are going to taste a little funny, and let's not even consider what will happen if you're washing your face and bits of old turkey end up on it!).

Removing the water
When the fat is completely strained, put it back onto the stove in its pot and let it come to a full boil. It will hiss and spit quite a bit, usually, as it steams and cooks out all the water. Continue to cook the fat on a low heat (just enough to make it bubble but not enough to cause it to boil over) until all the spitting stops. This can take anywhere from a few minutes to hours, depending on how much water is in your fat. If it looks like it'll be taking a long time, consider doing it in your crock pot on high, where you can leave it without worry of spilling over or burning.

The finished product can be stored in air-tight containers in the fridge for about three months, or in the freezer for up to a year. Turkey fat can be used in place of palm oil in soap recipes, and can be used for making pastries or anything that asks for butter or lard. It will harden up in the fridge until it looks just like store-bought lard, although it will be a darker color.

Check back often for information on canning, preserving, general homesteading and more. If you have questions or comments, please write to me below. I love to answer questions! You can follow the blog via Network Blogs and Google Friend Connect (see the left hand column for the button). If you purchase items I have linked through Amazon or the ads on my site, I receive an affiliate portion of the sale. If you find the items are useful, please purchase from my site!
 
You may also be interested in:

Making turkey broth from your leftovers
Protein - it's good for you!
Creamy Potato Soup
Prepping 101
Hungarian Cabbage Rolls

Thursday, November 22, 2012

Making turkey broth from your leftovers

Brine soaked, oven roasted turkey (1)
Ahhh... The pleasantly full feeling of satisfaction after the turkey has been devoured. The parade has been and gone, and you're half way through the Purina Dog Show when it hits you. You have two weeks worth of turkey sitting on the counter in the kitchen, and no room in the freezer for it because it's full of the other leftovers. Oy...

Well, ladies and gents, I'm here to tell you that this is not your worst nightmare. Indeed, it is your Lucky Day! Hooray for leftovers and especially for leftover turkey! Rejoice, because you are about to make ... BROTH!

Making and canning turkey broth is very simple, and better yet, takes up no refrigerator or freezer space at all. It does require a pressure canner, though, so if you don't have one then you'll need to squeeze the broth into the freezer after all. However, if you can beg, borrow or steal a pressure canner for just a few hours, you can make this, put it on your pantry shelf, and have a ton of home-made broth ready for any occasion.

I'm going to be making our turkey (on Saturday, not today, because we like to celebrate Thankfulness by being damn thankful we're not stuffing turkey butt at 6am LOL) in a Westinghouse roaster, but this recipe translates just as well to a regular roasting pan in the oven. The major difference is that if you're using a regular roasting pan, then you'll need to scrape the leftover contents of it into a large stock pot, whereas with the Westinghouse, you just continue right on without doing any extra dishes (there's that thankfulness again!).

Bacon wrapped turkey (2)
When you're finished roasting your turkey, you'll serve it up either whole or disjointed, and people will feast. The leftovers will likely sit on the platter for an hour or two while you burp and digest and generally allow the tryptophan to sooth your frazzled soul. Once you recover enough, brave the kitchen mess and pull off the majority of the meat from your bird and toss it into baggies in the fridge or freezer. Plastic containers will also do. Do reserve some for later, though, for adding to soup (if you make some) and sandwiches (for the day after).

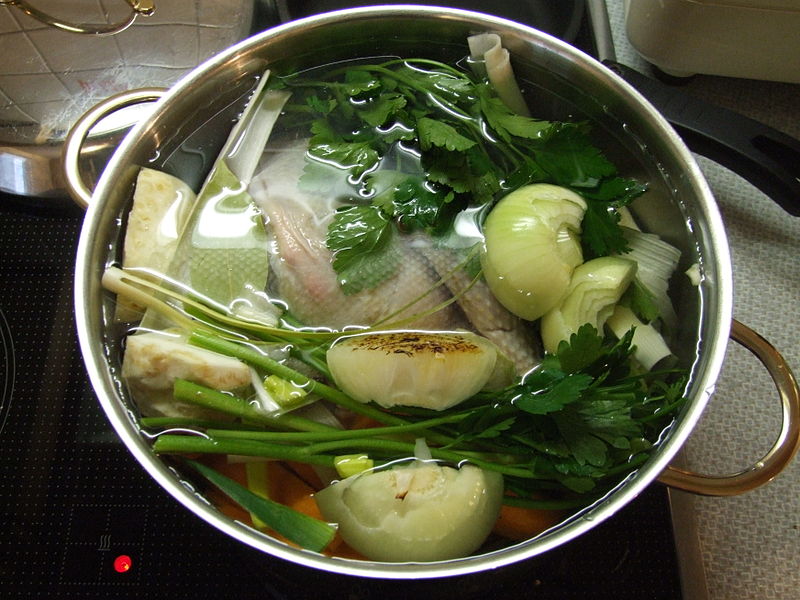
All that jellied stuff in the bottom of the pan, all the drippings left over from making gravy, all the bones and the whole carcass can be slid right back into your Westinghouse, or alternatively into a large stock pot. If it doesn't fit, hack it into pieces that will. You don't need pretty or neat, here; just make it fit. You'll be straining it later anyhow.

You can add many of your leftovers to the broth, if you like. Any onions and carrots (provided they're not candied) can be tossed in, as well as leftover gravy, green beans (so long as they're not in a cream sauce), cabbage, parsnips, and other root vegetables. Avoid potatoes, both sweet and regular, as they tend to make the broth a bit gritty sometimes. Fill the pot or Westinghouse with water, add a teaspoon each of salt, pepper, paprika, oregano and thyme, and then set the broth to simmering.

Making soup (3)
Ideally, you want to let it simmer overnight, however as long as it gets several hours of cooking you should be fine. Your broth should not come to a full boil during this process, or it won't be nice and clear (although it doesn't change the flavor much, in my opinion). Eventually, the carcass will fall apart, the neck bones will disappear into a mass at the bottom of the cooking container, and the vegetables will likely turn to complete mush. All this is fine. You may see a frothy scum at the top of your pot, and this should be skimmed off with a wooden spoon. Fat, on the other hand, should be left on the top for now. You'll remove that later.

During the later part of the cooking process, take a few sips of your broth. If it needs something, feel free to add it. Likely requirements will be more salt, and possibly such things as oregano, thyme, bay leaf, rosemary, and other "stuffing" herbs, as well as more onion, garlic, or chives. Don't be afraid to experiment, but use small amounts. Keep good records as you go through this process, because it will streamline the process for next time!

When the broth is done, you need to strain it. Line a colander with cheesecloth (or an old tee shirt or towel if you don't have cheesecloth) and pour the hot broth into another container (or two, if you're like me and make several gallons worth of broth). Remember to use hot pads and keep your face out of the steam!

The contents of your cheesecloth can be thrown away. At this point they are devoid of nutritional content and you can rest assured that you've plumbed the depths of their vitamins and minerals. The resulting broth, be it clear or cloudy, should be put in a cold place to chill for several hours. It is ready to work on again when the layer of fat on the top is solid and opaque.

Using a wooden spoon, carefully remove the hardened fat from the top of your broth. Depending on your preference, it can be saved in the fridge or freezer for use in other recipes (it's great in place of lard), rendered for use in pie crusts, soaps (it replaces the palm or coconut oil!) or other items, or tossed. There should be very little fat left in the broth when you are done (a bit is just fine).

Re-heat your broth, stir well, and then ladle into hot, sterile jars and process according to the directions for your pressure canner. Generally speaking, you'll want to process it at 15 pounds of pressure for 20 minutes for pints and 25 minutes for quarts. Always check to see if there is a different pressure for your area (if you're above or below sea level, pressure and timing can change dramatically!). Never "wing it" when it comes to pressure canning.

Another option for those little bits of broth that don't quite fill the last jar, is to freeze them in an ice cube tray. Each ice cube tray holds about one tablespoon of liquid. Once your broth cubes are frozen, store in a ziploc style baggie, and pull out anytime you only need a couple of tablespoons of broth. This way, you don't waste an entire jar opening it for such a little bit!

Check back often for information on canning, preserving, general homesteading and more. If you have questions or comments, please write to me below. I love to answer questions! You can follow the blog via Network Blogs and Google Friend Connect (see the left hand column for the button). If you purchase items I have linked through Amazon or the ads on my site, I receive an affiliate portion of the sale. If you find the items are useful, please purchase from my site!
 
You may also be interested in:

Protein - it's good for you!
Creamy Potato Soup
Prepping 101
Hungarian Cabbage Rolls
Danger, Will Robinson!

1) Photo by TheKohser / Wikimedia Commons
2) Photo by Dennis Crowley / Wikimedia Commons
3) Photo by Claus Ableiter / Wikimedia Commons