Tuesday, October 30, 2012

Hungarian Cabbage Rolls

The cabbage
I grew up with two distinct cultures in my life: Scottish and Hungarian. The Scottish side comes through in such things as the way I swear, my penchant for tea in the evening, and my endearing love for Doctor Who and all things British. My Hungarian side shines through my cooking, though, and my family enjoys the fruits of that labor.

I adore cooking the things my grandmother used to make for me when I was little (even though I sometimes didn't like them back then!). Chicken paprikash, potatoes and sausage stew, pork goulash, and cabbage rolls are some of the favorites around here. In the late autumn, when the huge cabbages are available everywhere for such cheap prices, it's the perfect time to make a huge batch of cabbage rolls.

You can find the actual recipe at the bottom of this article, after all the pictures and explanations are done with. This allows you to use the recipe as stand-alone, or to refer to the images. I know when I'm trying something new, I like to be able to see what the original chef did!

Taking out the core
Once you've found the perfect cabbage, give it a wash and remove the outer leaves until you're left with a covering of unblemished light green. Use a thick, sturdy knife to cut out the core in a wedge shape, preserving the size of the inner leaves as much as possible. This is done in order to help the leaves loosen during the next stage of preparation. It may take several tries to get enough of the core out, and that's okay. There is no perfect way to do cabbage rolls, and once they start eating them, you will find that most people don't care in the least what they look like.

Boiling the leaves off
I use my huge stock pot to boil the leaves off the cabbage.  You need to have a pot that will allow you to totally submerse your cabbage, as the boiling water is what helps ease the leaves off in one piece. This particular cabbage was so large that even in the stock pot, a tiny bit of it popped up out of the water. You should use a wooden spoon to push the cabbage under the water once it's boiling, in order to get the leaves to soften and come off whole. It may take quite a while to boil the water, especially if your cabbage was in the fridge before you started this process, but it'll get there eventually. Be patient, because this is the most difficult part of the whole ordeal.

Spray a pan
Some people cook their cabbage rolls in a stock or stew pot, but I like to do mine in the oven. Carefully grease a turkey or other large lidded pan (I use no-stick spray) so that the bottom and sides are completely covered. If you forget this part, your cabbage rolls will stick to the sides and/or bottom, and will fall apart when you take them out to serve them. You can do this while the cabbage is boiling, or while you're waiting for it to boil. I suggest bringing a book along, too, or some music, because it takes a while!

Grate an onion or two
You need to grate up your onions for this recipe. Chopping or dicing them just doesn't work. I use a hand-held grater and the handle part off of a mandolin slicer (to save my fingers from getting grated along with the onion!). Cut off one end of the onion, but leave the other end intact as you'll be using it to hold onto as you grate. I like to use two onions, but the amount is optional. Grated onion seems to expand and fill a lot more space than chopped does, so don't be surprised if your whole pan fills up. If you're like me and your eyes fill up with tears at the mere peeling of an onion, you can try the little trick I learned from Pinterest: wear goggles! I had a pair left over from soap making (lye and water can be dangerous) which I pulled on. I still got a little bit in through the edges, probably due to the fact that I had glasses on underneath the goggles, I didn't suffer at all through the grating process. I will always remember this.

The secret to not crying: goggles!

Cooking the onion
In a little bit of oil, butter, or melted bacon fat, sauté  your onions until they are clear. You'll know they're almost ready when most of the liquid is gone and the smell of fried onions fills your home. This is the beginning of the fun part of making cabbage rolls. Of course, you'll be doing this while your cabbage leaves are softening in the boiling water. That part takes a long time, and is quite tedious. However, the wait is completely worth it.

Loosening leaves
Throughout all the other parts of making the cabbage rolls, you'll be going back to the pot of boiling water with the actual cabbage in it. I use a large meat fork to hold my cabbage in place (with a plastic or wood handle so that I can leave it in the cabbage and not burn myself) and a wooden spoon to slide under the edge of the outer leaves. As they become cooked, they'll loosen up and you'll be able to encourage them to slide off. Generally, you'll get four to five leaves off and then have to wait again while the leaves that are now on the outside get soft. Scoop out the leaves that have come free, and set them on a towel to cool and dry off a bit.

Paprika makes it red
Once your onions are about done, add a couple tablespoons of good quality Hungarian paprika. I like the sweet kind myself (which still has a tiny bit of heat to it), but some people like to mix the hot and sweet together. Cabbage rolls are not meant to be spicy, so don't use all hot paprika. As you stir the paprika in, the whole pan will turn a lovely dark red color, and the scent of your onions will change slightly, taking on an earthier aroma. You will find that you know that aroma well if you do Hungarian cooking on a regular basis, because onions and paprika are the start of most Hungarian dishes.

Garlic, ready to mince
At this point you want to add about six to eight cloves of garlic to your onion mixture. I prefer to squish mine in a garlic mincer (as pictured), but you can also mince it up by hand, or even use bottled, pre-minced garlic. Fresh garlic has oils and flavors in it that no bottle can ever provide, though, so keep that in mind. Once the garlic is added, stir it around and let it cook into the onion mix fully. It should only take about three to five minutes for the garlic to be at the ready stage. Don't overcook the garlic, as it takes away from the essential oils and flavor of it.

The insides!
In a large bowl, mix together your (uncooked) rice, the onion and garlic mixture, and your ground meats. I used a blend of ground beef and TVP, but you could also use ground pork (though not sausage meat), ground turkey, or even ground venison. Each meat gives a slightly different finished flavor, but the results are similar enough that it's more personal preference than anything else. Use your hands to mix up all the ingredients well, forming a thick paste-like product that holds together in a ball without falling apart.

De-veining the leaves
While your meat is sitting, it's time to take all those leaves you've been drying and cooling, and process them. Each of the leaves needs to be carefully de-veined. Using a sharp knife, cut down each side of that thick middle vein and then remove it. The butterfly-shaped remains can be used as is or cut in half. The larger ones can be cut in half, and smaller ones used whole. You'll get a feel for this as you go along, but you'll want each piece to be about the size of your hand or a bit larger. Any smaller than that and you'll find that you don't have enough cabbage to tuck and roll, and your meat will fall out during the cooking process.

Use the veins
In Hungarian cooking, everything is used. There's no waste, because the Hungarians have been a poor people for so long, they've learned to use up everything. All the veins and trimmings from your cabbage get put into the bottom of your greased pan or pot. These will cook underneath the cabbage rolls, both imparting flavor and keeping them from sticking to the bottom. When raw, they're too big and crunchy to be edible, but after stewing at the bottom of the pan for hours, they become soft and delicious, and you may find yourself eating them.

Leaves on the veins
On top of the veins you put a layer of leaves. Use the ones that aren't quite the right shape or size, or that you accidentally ripped. These ones do not need to be perfect - save the perfect ones for the cabbage rolls themselves! You can also use some of the smaller inner leaves of the cabbage here. There comes a point in the peeling off of leaves that you reach leaves that are too small to use for rolling. While we have a use for the remaining core, a few of those smaller leaves can certainly be used here.

Making the roll
Pick out one of the largest leaves from your pile, and lay it out flat on a cutting board or clean counter top. In the bottom left corner, place an elongated ball of your meat mixture. The meat should sit comfortably in that little curve of leaf, as in the picture to the left. Don't use too much meat, and don't skimp, either. The meat should form into a fairly solid shape which keeps itself together. If it's too dry, you may need to add a bit of water or egg, but be careful not to add too much. If it's too moist, you can add a bit more rice or a sprinkle of bread crumbs. Again, be careful.

Roll it up
Roll up the bottom edge of the leaf, tucking it under the farther edge of meat. You should have your meat inside a cabbage "tube" now, with both ends open. Don't be disappointed if it doesn't work out right the first time or two. Do your best, and as you make your way through all the cabbage rolls, you'll get better at it. If there are bits of vein or hard cabbage that is stopping you from rolling, use a sharp knife to slice it off or cut it in such a way that you can continue to roll.

Tuck it under
Tuck the left edge under the meat, closing up one end of the cabbage roll. Roll again, so that it's held firmly in place. Then tuck in the remaining parts to seal the other end. If you have to undo it and re-do it a few times, don't despair. Do your best, as I said above, and you'll get better with practice. Eventually your fingers get a physical memory of the process of rolling cabbage rolls, and you'll look just as my grandmother did when she was doing it, whipping through the whole tuck-and-roll thing without even looking.

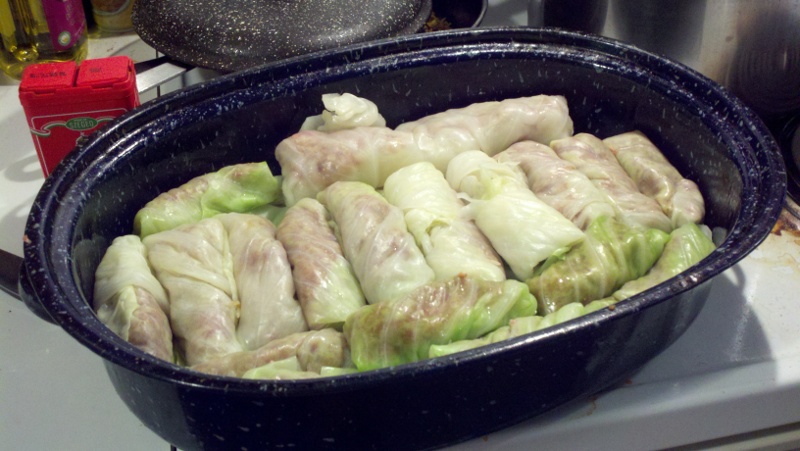
Finished rolls go in the pan
As you finish each roll, tuck it into place on top of the leaves in your pan or pot. If you have any rolls that seem a bit loose, tuck them in at the edges, where the other cabbage rolls will hold them in place. In a tall stock pot, you'll add a layer of leaves between each layer of cabbage rolls. In a pan like mine, you may only get one or two layers.

Add the sauce
Different places in Hungary differ on the types of sauce you should use. I grew up with the sauce being made from tomato soup which my grandmother made from scratch in massive batches and then home-canned. I later used store-canned tomato soup, and that's also effective. Lately, however, I have come to like adding fresh tomato sauce to my cabbage rolls. This time I used pureed tomatoes mixed with a few herbs and some paprika, which were then poured over the top. I also added a cup of V-8 because it is nice and juicy and has the right flavor. If you're cooking in a stock pot, you may want to add sauce in between each layer. In a pan, it isn't such a big deal because the sauce will move around as it heats up and boils.

Melting bacon fat
To make this meal traditional, you'll want to cook up some of the cabbage you had left over from pulling the leaves off. Dice or slice it however you like, and toss it into a pot with some melted bacon fat (I save mine whenever I make bacon, so that I can use it in recipes like this!). My grandmother would have used a half pound of bacon fat or lard, but I use about two tablespoons for a large pot, and then I add chicken broth, usually home-made, for the rest. This results in a finished product that my grandmother told me tastes just like hers, but with a reduction in calories of about 200%. A little bacon fat in something like this goes a long way, flavoring the whole pot of cabbage. This is true of most recipes, in fact.

Simmering cabbage
Let the cabbage simmer on low heat (or in a crock pot) while the cabbage rolls are cooking in the oven or on the stove. As long as you continue to stir it, and add liquid if it begins to dry out, you can cook it for hours and not hurt it. My grandmother would let it simmer for many hours, and the house would smell incredible. If you're feeling frisky, you can also add a bit cooked bacon to this pot for extra flavor. I often serve it all with noodles and sour cream, which rounds it out nicely.

Cabbage rolls, served hot (1)
Cabbage rolls should be brought to the table on a serving platter with sides, or in a large bowl. They become a bit sloppy after cooking for so long, and especially your first few times, you may have some that fall apart. The extra juice in the bottom of the pot is usually mixed with a roux and thickened, and served over the top of the cabbage rolls. Finish this dish off with a nice, warm crusty loaf and a stick of butter, and your family will clamor for more.

One of the best things about these cabbage rolls is that they freeze incredibly well. In freezer containers, add four or five rolls and pop them into the deep freeze for use later in the year. They microwave up beautifully, or can be dropped into a pot with a drizzle of water and stewed up.

Ingredients:
  • 1 large head of cabbage
  • 3 pounds ground meat (single type or mix)
  • 2 cups long grain rice
  • 2 onions
  • 6-8 cloves garlic
  • paprika, salt and pepper to taste
  • 2 quarts tomato sauce or soup

Boil the cabbage until the leaves come off. De-vein the leaves and set aside. Sauté onions and garlic with 1-2 tablespoons of paprika, and cook until soft. Mix together meat, rice,  onion mixture and 1-2 tablespoons of paprika, then set aside for the flavors to blend.

Well grease a large roasting pan or pot. Put cabbage veins and spare leaves into the bottom. Into each cabbage leaf, add a palm-full of the meat mixture, and roll up tightly. Place finished cabbage rolls into the pot or pan. Layer evenly, with spare leaves in between each layer.

Pour the sauce or soup over the cabbage rolls, being sure they are thoroughly covered. Cook, covered, in a 350F oven for 2-3 hours or more, or simmer on top of the stove for similar time. Near the end of the cooking time, check to see if the meat and rice are both done. If not, cook longer. Throughout the cooking process, check on liquid levels. Do not allow the cabbage rolls to boil dry! Too much liquid is self-correcting, while too little liquid will cause your cabbage rolls to burn and possibly be inedible.

Serve cabbage rolls with a dollop of sour cream, and some of the sauce. Traditional sides for cabbage rolls include crusty white bread, dill pickles and home-made noodles.

Check back often for information on canning, preserving, general homesteading and more. If you have questions or comments, please write to me below. I love to answer questions! You can follow the blog via Network Blogs and Google Friend Connect (see the left hand column for the button). If you purchase items I have linked through Amazon or the ads on my site, I receive an affiliate portion of the sale. If you find the items are useful, please purchase from my site!
 
You may also be interested in:


Danger, Will Robinson!
Cooking without electricity
Making dilled green tomatoes
Ham and Bean soup
Learning at the Freehold


1) Image by Loyna / Wikimedia Commons

Thursday, October 25, 2012

Danger, Will Robinson!

A gas generator (1)
I keep an eye on the weather throughout the day using a website called Wunderground. This morning, they sent me an email saying that their usual "winter preparedness" email series was being suspended because they wanted to do an emergency preparation series instead, ahead of the storm that's heading our way. I went to their website to check out all the details. The storm we need to watch, called Sandy, is currently (2:30pm EDT on Thursday, October 25, 2012) a category 2 hurricane coming through Haiti and into the Florida area.

Go grocery shopping (2)
Sandy may be downgraded to a nor'easter by the time it gets to New England where we are, but they are warning not to consider that lightly. Apparently, it's a 50% chance whether it'll head out to sea, or hit us square on. NOAA and other weather agencies are urging people along the coast and throughout New England (and New York City as well) to be prepared for emergency conditions. Part of the problem right now is that the autumn weather is not cooperating. They can't tell which way the wind will blow things, nor can they tell whether it will be warm and produce rainfall, or if it'll be cold and come down on us as hail, sleet or snow.

The bottom line is, be prepared. This doesn't mean you need to be ready for the Zombie Apocalypse, but it does mean making some common sense decisions now, well in advance of the possible storm.

Let's look at the whole Rule of Threes thing in regards to our potential storm. Those of us who may be in the storm's path should do what we can so that we're not a burden on the system. We can last three minutes without air (first aid), three hours without shelter, three days without water, three weeks without food and three months without hope.

Three minutes without air in this storm translates into being ready for possible household emergencies.  Is your first aid kit stocked up? Do you have bandaids, enough of the usual medications and vitamins, and a good supply of ibuprofen and acetaminophen? Consider the kind of injuries you might have to deal with during a three day storm with no power, and be ready for them.

Three hours without shelter isn't as difficult when you're already in your own home. If you lose power and have no other means of heat, wear several layers of clothing, close off all but one or two rooms of your house, and keep everyone in that small, confined area. Cover windows with thick blankets at night to hold heat in, and let the sun in during the day for as much passive solar energy as you can get. Break out the winter coats, gloves and shoes, and don't forget hats! A sleeping bag can keep you (or you and a child) warm, but you might be warmer if you and your whole family snuggle together in one place under the same batch of blankets. There's a reason Alaskan sled drivers used to sleep with their dogs!

Got fuel? (3)
Of course, if you have a fireplace or wood stove, make certain you have enough wood or coal on hand to see you through the emergency. Have the fuel in a spot that's easy to get to, and as much out of the elements as possible. Have tinder and small pieces of wood on hand to make starting your fire easier. If you run a generator, ensure it's full, and have an extra gas can on hand, and don't run it all the time (turn it on long enough to cool your fridge and freezer and run the hot water for bathing, then off again to conserve fuel).

Three days without water is unlikely to be a problem during a storm in New England, but having clean, potable water might be problematic. Do you have a way to filter water so it's safe to drink? Can you store some in clean milk jugs just in case you need it? At a minimum you'll want one liter of water per person per day, but if you're at home and you have the ability to store more, then do so. Water can be used for washing, drinking, flushing the toilet manually, brushing teeth, cooking, and a hundred other things.

Three weeks without food should not be a problem for anyone with the amount of advance warning we're getting about this storm. If you're not the type to keep a lot of food on hand, pop out to the store now and get some extra bread and milk, and any other staples that will be easy to cook with what you have on hand and that will last in the pantry if you don't have to use them.

Three months without hope doesn't seem to be something that would be an issue with the upcoming storm, but don't dismiss it so quickly. You may be stuck in the house with children or friends for a few days, and having some cards on hand for poker or euchre, or a board game or two, is easy to do. Pick up some popcorn at the store and have an old fashioned night of popcorn and story telling. Grab a few books and have them stashed in the room you'll retreat to if you lose power, and maybe have a craft or two ready to work on as well.

Cars get buried. (4)
All of the above might seem like over-kill, but consider for a moment the possibility of this storm (or another) catching you unawares in your vehicle. You've become blinded by snow or driving sleet, and you pull over. You're prepared, having a "get home" bag available to pull some food out of, and some warm clothes. You decide to wait it out, a sensible thing to do. Come morning, you wake up to find your car is thoroughly buried in snow, and you can't get out. What happens now?

If you're prepared, it's not going to be a problem. People will have at least a vague idea of where you are. You can expect outside help within a reasonable amount of time. If you're prepared, it might be uncomfortable but it won't be a panic situation, nor will it be a disaster.

Be prepared! Don't let yourself fall into the trap of thinking "preppers" are just doomsday prophets calling for the end of society. In reality, "preppers" were (and are) people like your grandparents, who put up food from their garden and who saved every penny to make sure they had what they needed. They're people who have the necessities on hand or know how to make them should something (like a surprise snow storm) happen. They're you, and me, and your neighbors, ready for whatever the New England weather throws at them.

Check back often for information on canning, preserving, general homesteading and more. If you have questions or comments, please write to me below. I love to answer questions! You can follow the blog via Network Blogs and Google Friend Connect (see the left hand column for the button). If you purchase items I have linked through Amazon or the ads on my site, I receive an affiliate portion of the sale. If you find the items are useful, please purchase from my site!
 
You may also be interested in:

Cooking without electricity
Making dilled green tomatoes
Ham and Bean soup
Learning at the Freehold
The Fall and Winter Update, 2012


1) Image by Calvin Ho Jiang Lim / Wikimedia Commons
2) Image by David Shankbone / Wikimedia Commons
3) Image by MJCdetroit / Wikimedia Commons
4) Image by woodley wonderworks / Wikimedia Commons

Wednesday, October 24, 2012

Cooking without electricity

My wood cook stove
There's some kind of emergency here in New Hampshire just about every winter. Either it's a major snowstorm, or we have flooding, or something else happens. Power goes out all over the place. You probably have candles, and maybe a lantern or two. You can pull out extra batteries for the flashlights. But what do you plan on eating?

Fire in the stove
 I love my wood cook stove. With it, I am not dependent upon the vagaries of the public utility system. I have the opportunity to largely ignore power outages, because my lovely Glenwood B provides us with heat and a place to cook. With its moderately sized firebox to the left, it's six "burners" on top, and the large and spacious oven area, it does everything our electric stove does, and more. And better yet, it does it with style. Nothing beats coming in from shoveling snow and putting your feet up on the chromed hob to warm them while a pot of soup simmers on top of the stove.

A casserole cooking in the oven
Wood stoves work differently than electric ones, or even gas stoves for that matter. The top of a wood stove is one big burner, despite the little circles you see on good quality cook stoves. There are no dials that adjust the heat; you have to learn to do that using wood and the position of your cooking gear on the stove top! In a way, though, the use of a wood stove for cooking is much more intuitive, much easier than doing so with an electric stove, despite the fluctuations in temperature. You learn it, much as you learn any new skill, and as you do you can enjoy knowing that your granny or great-granny probably learned the same skills many years ago!

Open for viewing
The magic of a wood stove starts in the fire box. Different stoves have them in different places, but the most common spot is on the left hand side. There's usually a little door that lets you in from the front to load wood, however you can also lift off the top burner circles and load up that way. Sometimes, that's a convenient way to load up initially, perhaps the night before, so that all you need in the morning is a single match to get your stove going for the day. The grate to the very left has a few uses. First, it swings open to allow you to pull out the ashes without disturbing the fire itself. This is very important if you're cooking something that takes a long time, such as a full size turkey. You can also slide open the little holes in the grating to allow oxygen to get in to the fire, which helps adjust the temperatures within. I liked to keep an old fudge pan in under there, so that when it was time to take out the ashes I just had to pull the pan out and dump it, instead of spending a lot of time raking and shoveling.

Oven racks, older than you think!
Soft woods, like pine or punky birch, are wonderful for getting your fire going. However, to cook anything, you'll want a nice hardwood like ash or oak. The best way to know which woods work for you is to actually use them and see what happens. Different areas of the country produce different types of wood, and those cause different heats and qualities of fire. If you're lucky enough to have a supply of appropriately sized split ironwood, you'll be able to cook anything!

A small box stove
Those circles that you see on any kind of wood stove are designed for use during cooking. If you want to fry something at high heat, pull out a ring and put your cast iron pot or pan right over the fire. Old cast iron actually has a ring on the bottom, which nestles into the cut out on the stove. This allows you to safely put your pan right over the fire, heating it quickly and efficiently. Woks, too, can be slid into the openings to allow more direct heat. If you need to simmer something, slide it way over to the right, away from the fire box. Wood stoves that have a shelf extending from the stove top allow you to keep the food warm without cooking it more. There are also usually shelves above the stove top, where it was common to keep a pot of water or tea or coffee for everyone. The shelves can be a good place to put your bread starter, if you happen to keep a sourdough handy.

The heat in a wood cook stove comes from that fire box, then initially goes directly up the flue. Once the flue is hot, there is a toggle you can push to the side to allow the heat to circulate inside the stove itself. Another toggle will force the air to circulate all the way around the oven before going up the flue. This heats your oven fairly evenly, although as with all ovens (even electric and gas ones), there will be hot spots.

In my opinion, a wood stove gives you a lot more scope for cooking than electric does. A proper dutch oven can be set inside for baking bread, or perched up top for making stew or soup. Any cast iron pan or pot can be used very easily and will provide an incredibly beautiful and non-stick surface for your cooking needs. You can pile the top of your stove with as many pots and pans as will fit, instead of being stuck with only the four standard burner spots of a regular stove. You can use griddles and large pans just as easily as small ones, because the heat is everywhere.

Of course, the best part of having a wood stove is that you can just light it up because it feels nice or looks good. While the fire within won't last as long as with a heating stove, a wood cook stove gives off a nice blast of heat and is generally pretty easy to keep going if you're up and about. There's just something cheery about sitting in the kitchen by the wood stove, having a cup of tea with family.

If you know how to use your wood stove before an emergency hits, you'll be proficient enough to feed your family easily when there's no power at all. You'll quickly become accustomed to keeping a large pot of water on the back of the stove, for washing up or for tea, or whatever else comes up. And you'll find your family tends to gravitate toward its cheery spot in whatever room you have it!

Check back often for information on canning, preserving, general homesteading and more. If you have questions or comments, please write to me below. I love to answer questions! You can follow the blog via Network Blogs and Google Friend Connect (see the left hand column for the button). If you purchase items I have linked through Amazon or the ads on my site, I receive an affiliate portion of the sale. If you find the items are useful, please purchase from my site!
 
You may also be interested in:

Making dilled green tomatoes
Ham and Bean soup
Learning at the Freehold
The Fall and Winter Update, 2012
Making your own fire starters 

Saturday, October 20, 2012

Gutterless Rain Barrel - a "Drain Barrel"

Gutterless Rain Barrel - a "Drain Barrel"

Okay, this is a fantastic idea. We don't have gutters on our house, and rain comes in sheets off a few places. A handful of these around the house would a) be neat and tidy, and b) collect a ton of rain water. Woo hoo!

Friday, October 19, 2012

Items for sale

I'm not sure how many of my readers are interested in cross stitch, but in an effort to raise funds for Christmas gifts for the kids, I am selling a few of my pattern books and samplers and such. If you're interested, do have a look. I have more pictures for interested parties!

Country Christmas Cross Stitch

Merry Christmas Collection cross stitch

Christmas Ornaments (101 patterns)

Merry Christmas ABC

Christmas Portraits

Wednesday, October 17, 2012

Recipe Exchange


Every week I read Little House on the Prairie Living's Old Fashioned Recipe Exchange. I love the ideas I get for making my own meals for the family. Sometimes it's a one-off, something I decide to try just because it sounds good, and more often, I'll grab a recipe that becomes a new favorite for the family. This week's exchange was yesterday and I missed it because I was busy with other things (like getting my press kit for my upcoming review of Rachel Held Evans' book A Year of Biblical Womanhood!). Now I'm getting caught up, and I just had to post!

I included my dilled green tomatoes and ham and bean soup (links below). I ran into several things I want to try out! From soft pretzel rolls to grouse in garlic butter, my mouth was watering. Have a peek, and maybe leave a recipe of your own behind for the rest of us to share!

Check back often for information on canning, preserving, general homesteading and more. If you have questions or comments, please write to me below. I love to answer questions! You can follow the blog via Network Blogs and Google Friend Connect (see the left hand column for the button). If you purchase items I have linked through Amazon or the ads on my site, I receive an affiliate portion of the sale. If you find the items are useful, please purchase from my site!
 
You may also be interested in:

Making dilled green tomatoes
Ham and Bean soup
Learning at the Freehold
The Fall and Winter Update, 2012
Making your own fire starters

Random quote

From my seminary alumni list:

"The older I get, the clearer it becomes to me that no one is cheated in this world, unless its by himself, but some of us are so wounded that we must return to the scene of the crime, must play with the fire that burned us, must live the scene out as many times as necessary until it comes out differently. We are not prisoners, no traps or snares are set about us, but many of us imprison ourselves or at least are helplessly stalled." -- Merle Shain

Monday, October 15, 2012

Homestead Barn Hop #83

It's time again for Prairie Homestead's barn hop! I posted up two links there, and I hope you'll consider going and checking out this week's links. There are a ton of interesting ones! If you want to participate in the hop, just click here. Do go and check them out, though. I've found dozens of interesting articles and links from the Barn Hop, and I'm really enjoying being a part of it.

Blessings!

Thursday, October 11, 2012

Making dilled green tomatoes

The last of the tomatoes from the garden
Sometime in October, it happens. The frost comes, and suddenly your tomato plants are drooping and have blackened leaves. It's time to pull them up and put your bed to rest for the winter. Yet what do you do with the tons of green tomatoes you probably still have left on the vines? Dill them!

Don't use this one
I pulled up all the plants, then carefully went over each branch to make certain I had pulled every green tomato off the vines. The bowl above was the result of my final tomato harvest, a happy sight. Green tomatoes can be fried, or made into relish, chow chow, salsa, or any number of other delicious things. My favorite is always dilled green tomatoes, though. The recipe can be made from any kind of green tomato, too: roma, grape, cherry, beefsteak, etc. I mix them all together. Be sure to go through each and every tomato separately and make certain that you only use the perfect ones. If there's a blemish or mark or split, set it aside.

Cut them up
All the tomatoes should be cut. Little ones, like this one, can be cut in half. Larger tomatoes can be sliced or quartered in the most convenient way. I try to use a wide variety of shapes and sizes, while keeping each piece bite size. Cutting the tomatoes not only makes them fit better into the jars during the canning process, it allows the brine to touch all the parts of the tomato, in and out, which makes them quite tasty. Stick with green tomatoes, too, by the way. Orange or red ones will become mushy, while the green ones stay crisp.

Aren't they beautiful?
I love the way my hands smell after I've been working with tomatoes for a bit. They are very earthy, the smell of autumn to me. The cutting up of the tomatoes, which were mostly cherries in my case, was rather meditative and I found myself getting into a rhythm and singing along with my Pandora station.

All cut up
The variations of color in green tomatoes is huge. Some are almost pink, while others are dark green. Still others are pale and almost sea-foam in hue. Once the tomatoes are all cut up, you can set them aside while you make the brine and clean up the mess that sometimes happens when you're sorting through tomatoes fresh from the garden. You can even salt the snail you accidentally brought in, and discover that they really do bubble and that you think you can hear them screaming...

My favorite cookbook!
You don't find a lot of recipes in modern cookbooks for green tomatoes. This is because we've become a nation of pre-ripened tomatoes. No one buys green tomatoes, and if you grow them yourself, you probably try and encourage them to color up. You might even have stuck the greener ones into a paper bag with a banana, trying to get the ethylene to ripen them for you. The work-around for this is to turn to older cookbooks. I use my favorite McCall's Cook Book , which was put out in 1963. It has a variety of ways to use up green tomatoes, and a large array of other useful recipes that you won't find in anything made after 1990. My copy is getting old and ratty, but I don't want to give it up!

The original recipe
Keeping in mind this is an older book, I checked out my new version of Putting Food By, and verified processing times. In 1963, they said to process the jars "as manufacturer directs." Not very helpful! But Putting Food By says that tomato pickles should be processed for 10 minutes (for pint jars) in a boiling water bath.

Salt in water
The brine is made by mixing together 2 cups of white vinegar with 1 cup of water and 2 tablespoons of salt. It's a very simple brine; you bring it to a rapid boil, then reduce the heat and simmer it for five minutes. The acidic scent of the vinegar is very pungent, burning the nose slightly. I used the fan on my stove to keep the fumes to a minimum. When boiling vinegar, never use an aluminum pot (unless it's coated). Use steel or cast iron instead.

Tomatoes in the brine
When the simmer is finished, add your cut tomatoes and bring to a boil again. Turn off the heat, and then it's ready to spoon into the jars. Speaking of the jars, they should be in your water bath canner, upside down with a couple of inches of water in the bottom. Bring the water to a low boil, then turn it down to keep the jars hot and ready for you. There are racks (like the one in this Canning Kit ) to make getting the jars in and out easier, or you can use a jar lifter like I do. Just don't stick your hands in there - it's hot!

The tools: cookbooks, jar lifter, hot pad, spoon, ladle
Take a hot jar out and set it on a steady surface. I like to put mine into a metal bowl with a flat bottom to minimize mess if I spill. Use a Wide Mouth Funnel to get the tomatoes into your jars. I used pint jars and one jelly jar for these because I wanted them to be for gifts at Christmas and Yuletide. Jelly Jars are very pretty with their diamond pattern, and hold a couple of servings worth of tomatoes, just perfect for being wrapped up.

A filled jar
In each jar, before adding the tomatoes and brine, put a split clove or two of garlic and a small head of fresh dill (or a half teaspoon of dry). Using a slotted spoon, put the tomatoes into the jar, then top it up with brine. The tomatoes should be about 3/4" from the top of the jar, and the brine should completely cover them. A good rule is to add the brine until it touches the bottom of your funnel. Use a long knife or plastic tool to release any bubbles in the jar, top up with brine as necessary, then put on a hot lid and ring. Put your jar right back into the canner, right side up this time. Repeat this process until all your jars are filled.

Jars in the canner
When all the jars are filled, lidded, and in your canner,  you'll need to add more water. For water bath canning, you want to have an inch to an inch and a half of water over top of the lids. Sticking a finger into the water (before it's boiling!) you should be able to get almost to your second knuckle before touching the jars. Bring the heat up to a boil, and once the water is boiling, put the lid on your canner. If you're using a pressure canner like I do, be careful not to lock the lid in place - this is not a time when you want the pressure to build up.

The finished product, looking awful nice!
Once the lid is on your canner, set your timer for ten minutes if you're using pint or smaller jars, and 15 minutes if you're using quarts. When the timer goes off, turn off the heat and wait for the boiling to subside, then take off the lid and use your jar lifter to take the jars out. Set them neatly and carefully on a counter or other flat space where they can be undisturbed for at least a couple of hours, until they are cool to the touch. I always put mine onto an absorbent dish towel, which protects my counters from the heat and keeps them from dribbling water all over.

If you want to give your canned dill tomatoes as gifts, you can try your hand at decorating them. It's pretty easy, and there are lots of ways to do it. Some people like to sew fancy 'hats' for the jars, held on by ribbon or string. Others will use stamps to create little tags and tie them on with seasonal ribbon and appropriate decorations like jingle bells. You might enjoy making lid labels using scrapbooking or wrapping paper. There are dozens of ways to do it, and you're limited only by your imagination (and your budget).

 To fill 5 pint jars, you will want to follow these directions:

Ingredients
  • 3 lb medium green tomatoes, washed
  • 2 cups white vinegar
  • 2 tablespoons salt
  • 3-6 cloves garlic, peeled and split
  • 5 fresh dill springs or 1/2 teaspoon dried dill per jar
Remove any stems from your tomatoes, and cut into bite size pieces. Cherry and grape tomatoes need only be split in half. In a saucepan, combine vinegar with 1 cup water and the salt, and bring to a boil. Reduce the heat and simmer, uncovered, for five minutes. With a slotted spoon, ladle the tomatoes into the hot jars. To each jar add 1/2 clove of garlic and a dill sprig. Fill with the vinegar brine to within a half inch of the top. Add the lid and ring, and process for 10 minutes for pints, 15 minutes for quarts.
-- Adapted from Dilled Green-Tomato Pickles from McCall's Cookbook 1963 Edition.

Check back often for information on canning, preserving, general homesteading and more. If you have questions or comments, please write to me below. I love to answer questions! You can follow the blog via Network Blogs and Google Friend Connect (see the left hand column for the button). If you purchase items I have linked through Amazon or the ads on my site, I receive an affiliate portion of the sale. If you find the items are useful, please purchase from my site!
 
You may also be interested in:

Ham and Bean soup
Learning at the Freehold
The Fall and Winter Update, 2012
Making your own fire starters
Using a FoodSaver