There's some kind of emergency here in New Hampshire just about every winter. Either it's a major snowstorm, or we have flooding, or something else happens. Power goes out all over the place. You probably have candles, and maybe a lantern or two. You can pull out extra batteries for the flashlights. But what do you plan on eating?
Fire in the stove
I love my wood cook stove. With it, I am not dependent upon the vagaries of the public utility system. I have the opportunity to largely ignore power outages, because my lovely Glenwood B provides us with heat and a place to cook. With its moderately sized firebox to the left, it's six "burners" on top, and the large and spacious oven area, it does everything our electric stove does, and more. And better yet, it does it with style. Nothing beats coming in from shoveling snow and putting your feet up on the chromed hob to warm them while a pot of soup simmers on top of the stove.
A casserole cooking in the oven
Wood stoves work differently than electric ones, or even gas stoves for that matter. The top of a wood stove is one big burner, despite the little circles you see on good quality cook stoves. There are no dials that adjust the heat; you have to learn to do that using wood and the position of your cooking gear on the stove top! In a way, though, the use of a wood stove for cooking is much more intuitive, much easier than doing so with an electric stove, despite the fluctuations in temperature. You learn it, much as you learn any new skill, and as you do you can enjoy knowing that your granny or great-granny probably learned the same skills many years ago!
Open for viewing
The magic of a wood stove starts in the fire box. Different stoves have them in different places, but the most common spot is on the left hand side. There's usually a little door that lets you in from the front to load wood, however you can also lift off the top burner circles and load up that way. Sometimes, that's a convenient way to load up initially, perhaps the night before, so that all you need in the morning is a single match to get your stove going for the day. The grate to the very left has a few uses. First, it swings open to allow you to pull out the ashes without disturbing the fire itself. This is very important if you're cooking something that takes a long time, such as a full size turkey. You can also slide open the little holes in the grating to allow oxygen to get in to the fire, which helps adjust the temperatures within. I liked to keep an old fudge pan in under there, so that when it was time to take out the ashes I just had to pull the pan out and dump it, instead of spending a lot of time raking and shoveling.
Oven racks, older than you think!
Soft woods, like pine or punky birch, are wonderful for getting your fire going. However, to cook anything, you'll want a nice hardwood like ash or oak. The best way to know which woods work for you is to actually use them and see what happens. Different areas of the country produce different types of wood, and those cause different heats and qualities of fire. If you're lucky enough to have a supply of appropriately sized split ironwood, you'll be able to cook anything!
A small box stove
Those circles that you see on any kind of wood stove are designed for use during cooking. If you want to fry something at high heat, pull out a ring and put your cast iron pot or pan right over the fire. Old cast iron actually has a ring on the bottom, which nestles into the cut out on the stove. This allows you to safely put your pan right over the fire, heating it quickly and efficiently. Woks, too, can be slid into the openings to allow more direct heat. If you need to simmer something, slide it way over to the right, away from the fire box. Wood stoves that have a shelf extending from the stove top allow you to keep the food warm without cooking it more. There are also usually shelves above the stove top, where it was common to keep a pot of water or tea or coffee for everyone. The shelves can be a good place to put your bread starter, if you happen to keep a sourdough handy.
The heat in a wood cook stove comes from that fire box, then initially goes directly up the flue. Once the flue is hot, there is a toggle you can push to the side to allow the heat to circulate inside the stove itself. Another toggle will force the air to circulate all the way around the oven before going up the flue. This heats your oven fairly evenly, although as with all ovens (even electric and gas ones), there will be hot spots.
In my opinion, a wood stove gives you a lot more scope for cooking than electric does. A proper dutch oven can be set inside for baking bread, or perched up top for making stew or soup. Any cast iron pan or pot can be used very easily and will provide an incredibly beautiful and non-stick surface for your cooking needs. You can pile the top of your stove with as many pots and pans as will fit, instead of being stuck with only the four standard burner spots of a regular stove. You can use griddles and large pans just as easily as small ones, because the heat is everywhere.
Of course, the best part of having a wood stove is that you can just light it up because it feels nice or looks good. While the fire within won't last as long as with a heating stove, a wood cook stove gives off a nice blast of heat and is generally pretty easy to keep going if you're up and about. There's just something cheery about sitting in the kitchen by the wood stove, having a cup of tea with family.
If you know how to use your wood stove before an emergency hits, you'll be proficient enough to feed your family easily when there's no power at all. You'll quickly become accustomed to keeping a large pot of water on the back of the stove, for washing up or for tea, or whatever else comes up. And you'll find your family tends to gravitate toward its cheery spot in whatever room you have it!
Check back often for information on canning, preserving, general homesteading and more. If
you have questions or comments, please write to me below. I love to
answer questions! You can follow the blog via Network Blogs
and Google Friend Connect (see the left hand column for the button). If
you purchase items I have linked through Amazon or the ads on my site, I receive an affiliate
portion of the sale. If you find the items are useful, please purchase
from my site! You may also be interested in:
I love fires, and we're just entering the season for it. The nights are cold, sometimes hovering down around freezing, and even the afternoons are chilly with the overcast skies and the on-again off-again rain. While we aren't at the moment of winter, where the fireplace gets lit and stays lit until spring, it's definitely that time when we occasionally decide we want the house warmer than it is on its own. There's something emotionally boosting about a nice wood fire, too, that tells you you're safe and snug in your own home. It's a sense of security like no other.
The basics
Starting a fire in damp weather can be a real hassle. Struggling with paper or cardboard, chemical starter logs, or tinder that isn't quite dry is frustrating and it takes away from the enjoyment of your fire. It can also pump a lot of smoke into your house, which is not good. Rather than pay for expensive firestarters, why not make your own? They're so simply and easy, and are made from things found around the average house. It takes only a few minutes to put them together, and a couple of hours to let them dry and cool, and you'll have dozens sitting ready to light up your fire.
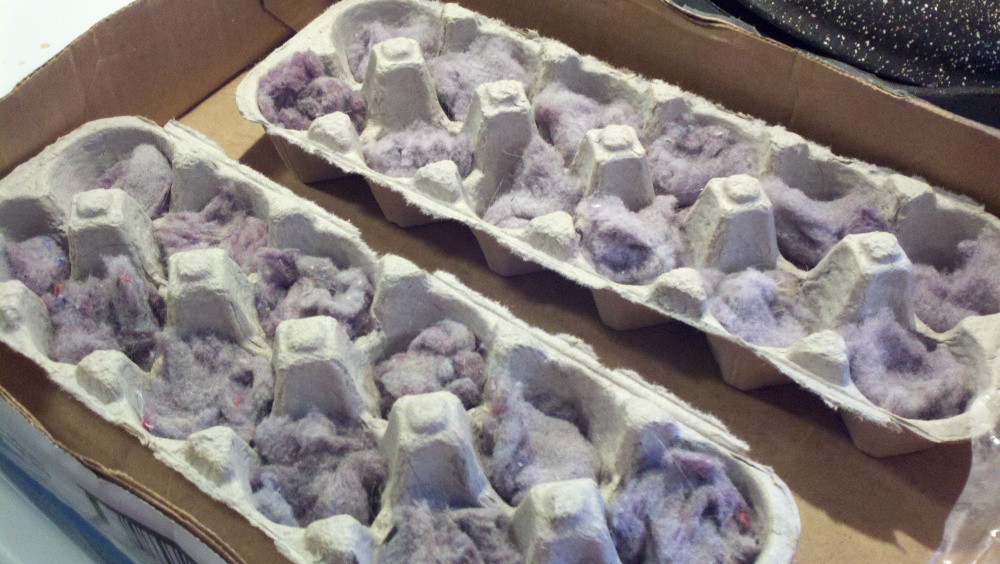
Lint makes great tinder
Begin with the basics of the firestarter: an egg carton (or several), some wax (bee's wax, paraffin, or left over candle stubs are all fine), a pile of dryer lint and some wood shavings or finely shredded paper. I tend to make firestarters around canning time, so I use the wooden boxes the jars come in as holders. Since the boxes are covered in a somewhat waxy substance, and are also plastic wrapped, you don't have to worry about the melted wax weeping onto any furniture or table tops. You could also sit them on folded newspaper or old cardboard boxes.
Melt your wax
In a pot that you don't care about (once it's held melted wax it will no longer be good for anything else), melt up your wax. I have a metal bowl that works very well for this, but you could just as easily pick up an old double boiler or pot at Sally Ann or Goodwill. Set your stove to a medium high heat, and don't leave. Wax is flammable, and needs to be tended. Luckily, this stage doesn't take very long. About five minutes will melt a block of paraffin wax the size of an apple. If you see smoke, turn down your heat a little bit, as it can scorch the wax and could lead to a fire. If you spill wax on your counters or stove, wait for it to cool and then pop it off using a plastic knife or spatula.
Fill the cups with lint
While your wax is melting, you can work on the body of your firestarters. Rip the tops off your egg cartons, because there's no use for them in this. The lip that keeps the lid closed can go, too. Place your egg cartons onto whatever safe base you have, and then fill each egg cup with about a tablespoon of lint. It doesn't matter what color or texture the lint is. All lint burns very quickly, and so it makes excellent tinder. Some campers keep a tiny zip baggie filled with lint for starting their campfires easily.
Add the wood shavings
My partner happens to like doing wood working, and so there's always a ready supply of wood shavings from his planer for me to use in making firestarters (or to use as mulch in the garden). I add some of the wood shavings to the wax because it makes it easier to pour. However, you can also tuck the wood shavings into the egg cups with the lint, then pour the plain wax over the whole thing. Either way is acceptable. It's a personal choice.
Pour in the wax
Pour the wax into the egg cups as evenly as you can, making sure to coat the lint and wood shavings completely. The wax acts just as candle was does, protecting the wick from burning up too quickly. It also keeps the lint and wood very dry, which allows you to use them even in damp or wet weather.
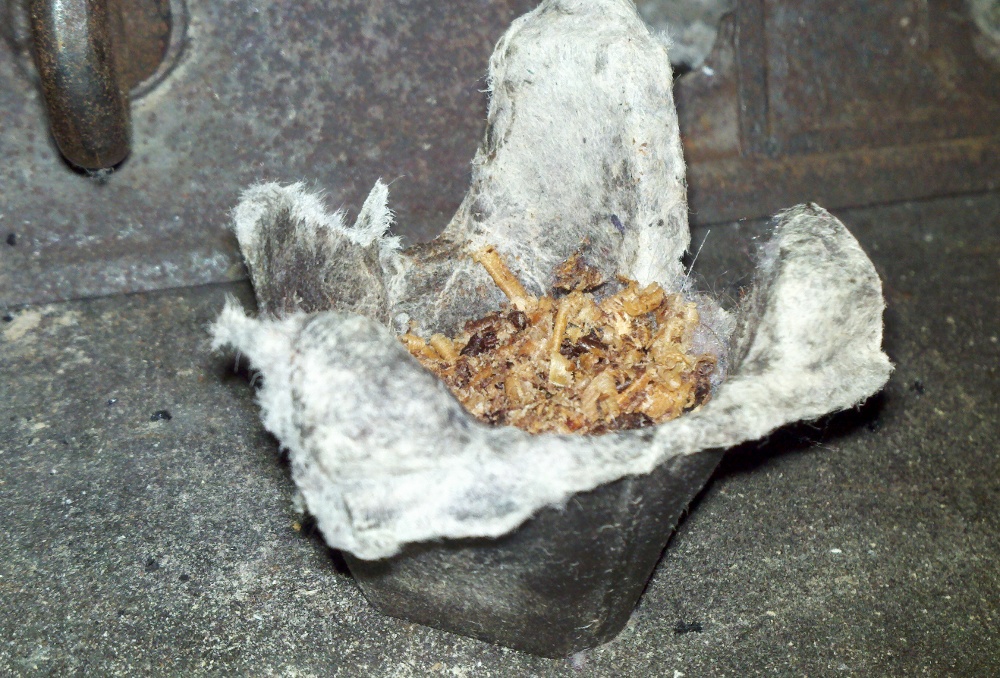
A single firestarter
Let your wax dry and cool completely before doing anything else. Once it's cool, you can cut the egg cups into separate pieces and store them in a zip baggie or plastic container. Each firestarter should burn for 3 to 10 minutes depending on the size, amount of lint and wood, and amount of wax used. For a fire designed to heat the house, I will lay down a piece or two of newspaper, place a firestarter at either end of the woodstove, then place small bits of wood on top of that. I then light the newspaper, which in turn lights the firestarters. As the fire picks up, I add medium then large pieces of wood.
Light it up
For a camp fire or a fire that you're starting without paper, it's quite easy to light the firestarters. Using a match or lighter, just set fire to one corner of the egg carton and it should immediately catch. Be sure to have the firestarter where you want it before lighting it, because they catch very quick and burn very hot. Provided you're not using green, wet wood, it ought to begin to smoke and burn within a few minutes.
It really is that easy. I love making my own firestarters, and the kids help with portions of the creation, too. They love playing with dryer lint, and will happily stuff egg cups for me while I'm preparing the wax. The starters do a great job of getting most any fire going well, including outdoor fires for camping and such.
The following video is a short view of one of my firestarters burning merrily in the fireplace at my home. You can see how well it catches, and how steadily it burns. The video should give you a good idea of what your final product should look like.
It is time for preparation. I've pored over the seed catalogs and sketched out the the garden plans. I've gotten wonderful and amazing seeds from the Thrifty Mama on a Trailer Park Homestead to add to my box of seeds for use this year. I've been squirreling them away since last fall, when we got the house and I knew for certain we'd have a place to garden this year. I also have some dried beans and dried blue popcorn that I hope to germinate.
I used some freezer jam jars with lids to test whether my seeds were still good. So far, my peas, beans, lettuce, and a few others have sparked off little green shoots and leaves in their glass and wet paper towel homes. I'm quite thrilled to see them questing for light up on the sill of our kitchen window. They get a grand amount of sunlight there, although it hasn't been the warmest place. The corn, green peppers, and delicata squash seeds haven't yet done anything, but I wonder if perhaps they're just too cold despite the sunlight. If they don't sprout soon, I plan on moving them to a warmer place with a bit less sunshine, in the hopes that they will perk up and prove to me that their still-packaged brethren are ready to be planted next month!
Out of sheer desperation, I have also planted some of my herbs, in "mini-greenhouses" that I created myself. I suppose the term I should use is up-cycled, as they are made out of take-out containers with clear plastic lids. The two large ones are made out of grocery store rotisserie chicken packages, which are just the right depth (a bit over an inch) and have that nice popped up top. I poked a couple of holes in the plastic bottoms to allow drainage, filled it with organic starter mix, and liberally dusted their tops with a bit of oregano and cilantro. The smaller one is a Chinese take-out container which now contains chive seeds, tucked into a pretty and moist earthen bed. They're not in the chilly kitchen, though. They are living on the little dry sink in our living room, very near the wood stove, where they will get quite a bit of sunlight and a lot of warmth each day.
I had to plant something. I had to smell that incredible scent of fresh soil, and feel it between my fingers. There is a lot more to plant, and I have toilet roll tubes to use as seedling starters, as well as some of the little soil pucks that expand into seedling size bags of soil. Sometime in mid-March, the tomatoes will get started, and even a couple of cucumbers. I don't do many cukes, because they grow best outdoors in the free soil, but I find that one or two started indoors is fun for myself and the kids, and if hardened off correctly, will start bearing a week or two earlier than their younger companions. I'm such a kid when it comes to seedlings and fresh vegetables. I want more and more!
It isn't all easy chores, though. Because we just moved into the house, we didn't have any wood chopped and drying before we moved in. We've been scrambling each week to keep enough wood chopped and split to keep us warm. The unreasonable price of oil is very dissuasive; we try to avoid using the oil furnace except to keep the house about 55F at night. The wood stove is going almost all the time, a dry heat we're thankful for in the chilly weather. Hubby has been chopping up the wood as we bring it in (it's fallen wood in the forest behind our house, already partially dried thank heavens). I've been helping more with stacking and arranging, though I've done a bit of splitting myself. While I have lamented having enough snow (I worry about drought this summer), the mild winter has been a blessing because we've been able to keep ahead of the cold with our wood supply. If it had been much colder and snowier, we'd have had a lot more problems.
We're also not neglecting our frozen stores. I was almost out of my previous batch of turkey broth, having used it in several recipes and a batch of turkey soup when I was ill. We defrosted and cooked up a deli chicken (rotisserie style) and a turkey breast (also rotisserie style) which we'd been given by a friend. After cooking all day (well, re-heating, as they were already cooked) in the crock pot, they fell apart during the meal that we enjoyed. Then I took every part of it we didn't devour, bones and all, and popped it all right back into the crock pot and poured in water and spices, and let it cook on low overnight. By morning, I had an incredibly tasty batch of boiled chicken which I used in another recipe. The bones were tossed out, and the broth itself I put into a big pot and jazzed up with some spices. I let it simmer down quite a bit, until it was double strength, and then I froze it (pictured above) in small containers. Whenever I need a bit of broth, I just grab one of these bad babies out of the freezer, and voila!
Today being a nice warm day (it was 54F earlier!), we decided to use a creosote eating log in our wood stove. Though the creosote isn't as much of a danger with the set up that we use, we figured it was better to get rid of as much of it as possible. The log has chemicals (yea I know... not great) that bind with the creosote and make it brittle. Over the next few days we'll have a bit of dust come down, and it'll all clear itself out. It's good, because our fireplace will burn much more efficiently.
What preparations are you making for spring? Are you planting in flats indoors? Sketching up your garden plans? Checking out the local CSAs to see which one fits your lifestyle and budget best? What things occupy your February time?
We're lucky. Behind our house is a largely vacant lot of forest. It's a plot about 20+ acres, with a ring of houses all the way around it. No one appears to ever go back there (judging by talking with neighbors as well as simple observations that there are NO paths at all). It's full of downed wood, half rotted stumps, and trees dangling precipitously from other tree branches. We decided that we wanted to both improve our view and heat our home.
We don't have a wood splitter this year. We don't have a 20 lb maul. We don't have a tractor to drag out the logs to convenient places to buck them. But we do have one another, a decent 8 lb maul, a wheelbarrow, and a really good chainsaw. With a bit of (okay a LOT of) work, we've managed to pull about 2 cords worth of trash wood out from behind the house. We're not touching standing live trees, as it isn't our property as we're well aware. But the fallen (and partially fallen) trees are dangerous to our children, who go tromping around in the woods (and as it isn't posted, it IS free for people to go wandering through). The neighbors who've noticed (most of them) have commented how nice it looks back there now. Go team!
So this is how it works. Gray goes out back and finds a solid but downed tree. It has to not be punky or riddled with too many holes. He proceeds to use his chainsaw to buck the wood into 16" logs. These are loaded onto the wheelbarrow and rolled out to the front of our house. There, we have a nice stump just right for splitting wood on. The logs go onto the stump, and Gray splits it with his little (but extremely effective!) maul. The kids and I pick up the pieces and until today, we'd been putting them into the emptied blue bins we moved our things in. Today, our wood supply exceeded our available bins (and porch space) and so the remainder of the wood (a half cord or so) was wheeled over to the side of the driveway and neatly stacked by the children.
The full bins came into the roofed porch, to wait for use. When we get low inside, we pull a bin in and empty it into the space behind our woodstove. There, it dries sufficiently to be used in the stove. By using this "free" wood, we have kept the house at a livable temperature since the October snow storm. The furnace is set to 55F, but I don't believe it has come on at all since we got the woodstove hooked up! The main part of the house stays at about 64F or so, quite decent.
Wood, as the saying goes, warms you several times., so you really get your money's worth. You're warmed while harvesting it, warmed again while bucking and splitting it, then warmed while bringing it in to burn. Then, when you burn it, it warms you again. It's lovely heat, so cozy and deliciously scented. Some of the wood we've gotten has been hard maple, oak, and spruce. All of it has its own scent, its own burning time, and its own temperature while burning. It's all very interesting and fun to learn about as you struggle to keep the fire going efficiently.
How do you heat your home? Do you have an oil furnace? Gas? Plain ol' electric forced air? When I grew up, I took heat for granted. It was "just there" no matter the time of day or night. The gentle flick of a finger brought about a change in the temperature that kept you from knowing exactly what the outside world was like. Now, working for my heat, I have much more appreciation for it. Our children are growing up in a different world, one where "not stacking the wood" means "being cold every night for a week."
A few days ago, we staked out the ground guides for my new cabin. It's just going to be a tiny little thing, a mere 8' x 8' long. This is the view of the front of it, or what will be the front of it. The posts are gone as of yesterday, and instead there are four 9" holes in the ground. Into those holes will go poles, and then the building will begin in earnest!
I'm really excited to be doing this. I'm looking forward to having private space away from the family. I'm looking forward to having a place that I can go with the kids to have a fun night out. I'm enjoying the idea of going up to do reading and writing. Maybe I'll find myself an old manual typewriter and haul it up there. After all, I learned on a Manual Remmington!
As I'm cleaning up the space in preparation for the building, I'm finding a lot of dryish wood. I have been cutting it up using a bow saw I found in the garage, because my axe is both completely dull and too large for the job. I'm also nick-named "Lightning" around here, because I never strike twice in the same place... In any case, as the pieces are cut to length, I am stacking them on a pallet right next to where my door will eventually be. The interior space will be too tiny to hold more than a few pieces of wood, so I figured a nearby pile would be great. If I put a tarp over it, the wood will be both convenient and dry. Maybe I can devise a "roof" for it of some kind, so I don't have to fumble my way beyond a plastic barrier.
Here you can see my wood cutting set-up. The stump there has been sitting for many years, and has a jagged back edge which lets me keep logs from rolling around. All I do is wedge it up there and put my foot on the log to keep it steady, and saw away. It's not the greatest way to do it, but it does work well enough. I've gotten most of the first level of the pallet cut, completely on my own (which is a bit of a feat considering how out of shape I am, how large and heavy the trees are, and the fact that I've only put in about six hours total). It might not be much, but the area around my "house to be" is much cleaner than it was, and now has the start of a wood pile that will feed my stove in winter to keep me warm and happy.
Here I am, your noble author, in my winter work-out gear. My jeans are too big since I lost 15 pounds, but that's okay because I have on knee high socks, extra shorter socks, long johns, and a tucked in thermal shirt under those jeans. It keeps them from falling down... mostly. In this pic I've ditched my winter jacket. I need the warmth of it for travelling up and down the hill, but once I'm there and working it takes only a few minutes to take it off. I try to leave the hat on unless I'm really sweating, because I know that's where I lose most of my heat. I stay hydrated by making sure my canteen has nice clean water in it, and if I run out the river is just behind me.
It is my hope that the end result will be somewhat like this log cabin. I won't have the two slope roof, though, just a single slope from the back to the front (and the door will be on the side). We'll see... we'll see... Wish me luck!